The HL7 plugin provides a standardized interface for data exchange between the Vienna Test System (VTS) and external systems. It is available as plugin of the VTS integration service (VIS). It facilitates the HL7 (Health Level Seven) standard for the electronic exchange of clinical and administrative data between healthcare systems. It enables seamless communication between various medical applications, ensuring interoperability and efficient data sharing.
The plugin implements a subset of the HL7 version 2.5.1 standard, the following message types are supported:
-
ORM – Order messages
-
Used for creation of new persons and assigning testing to that person
-
-
ORU – Observation result messages
-
Used for output of test results in numerical format
-
-
MDM – Medical document management messages
-
Used for output of test results in PDF format
-
VTS implements a subset of segments for each supported message type, tailored to the needs of our system. More information about the structure of messages can be found in the sections for each message within this documentation.
Overview of functionality
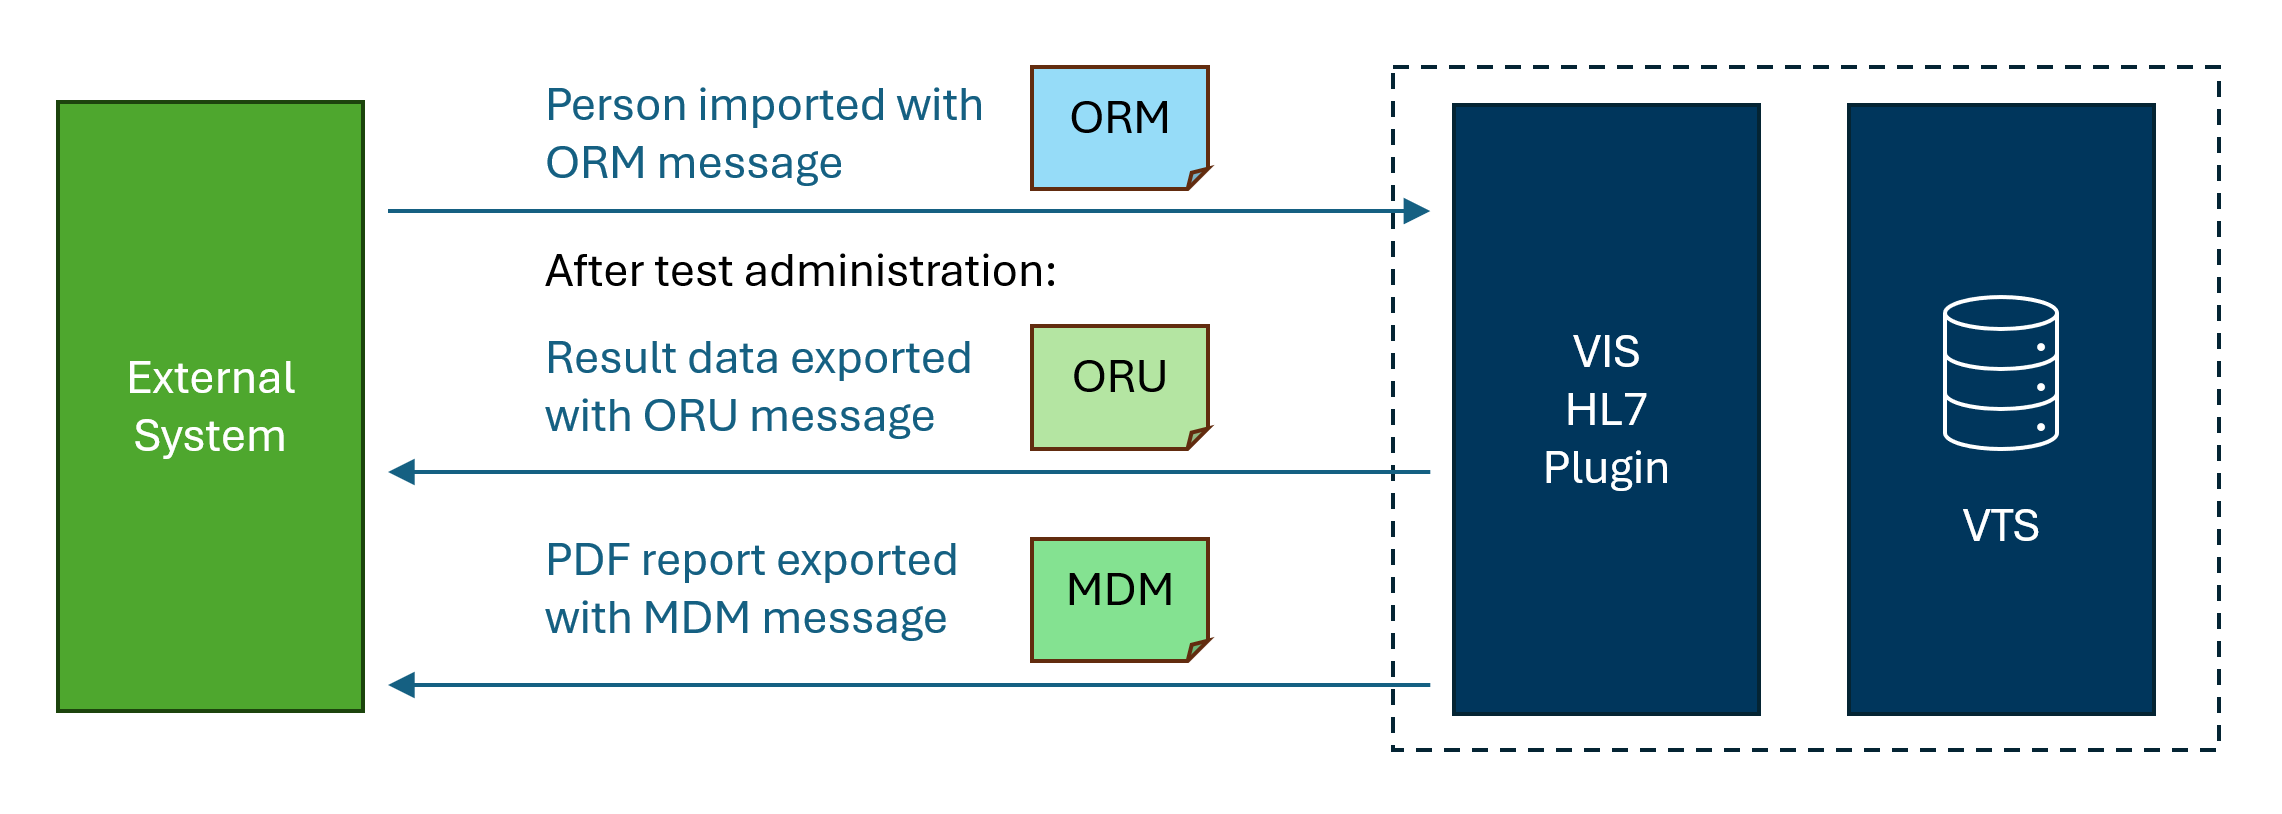
The HL7 plugin enables both the import of persons into the system as well as the automatic export of test results and reports after a completed testing. Persons are imported using ORM messages that allow the specification of personal data (e.g. first name, last name, date of birth) according to the HL7 standard. Once a person is successfully imported, testing can begin based on the customer’s workflow — either through Direct Testing or by starting the test directly from the VTS administration software.
After a testing is completed, the HL7 plugin can trigger an automatic export back to the connected external system:
-
Test result values are exported using ORU messages
-
A PDF document containing test results or PDF reports generated from a Word-based report template are exported using MDM messages
The plugin supports exporting both ORU and MDM messages, or just one of them, depending on the preferred configuration.
Only persons that have been imported via HL7 trigger an automatic export via HL7. Test results for individuals who are manually created or already exist in the system prior to HL7 import will not be exported. The following diagram outlines the basic workflow when using VTS with the HL7 plugin:
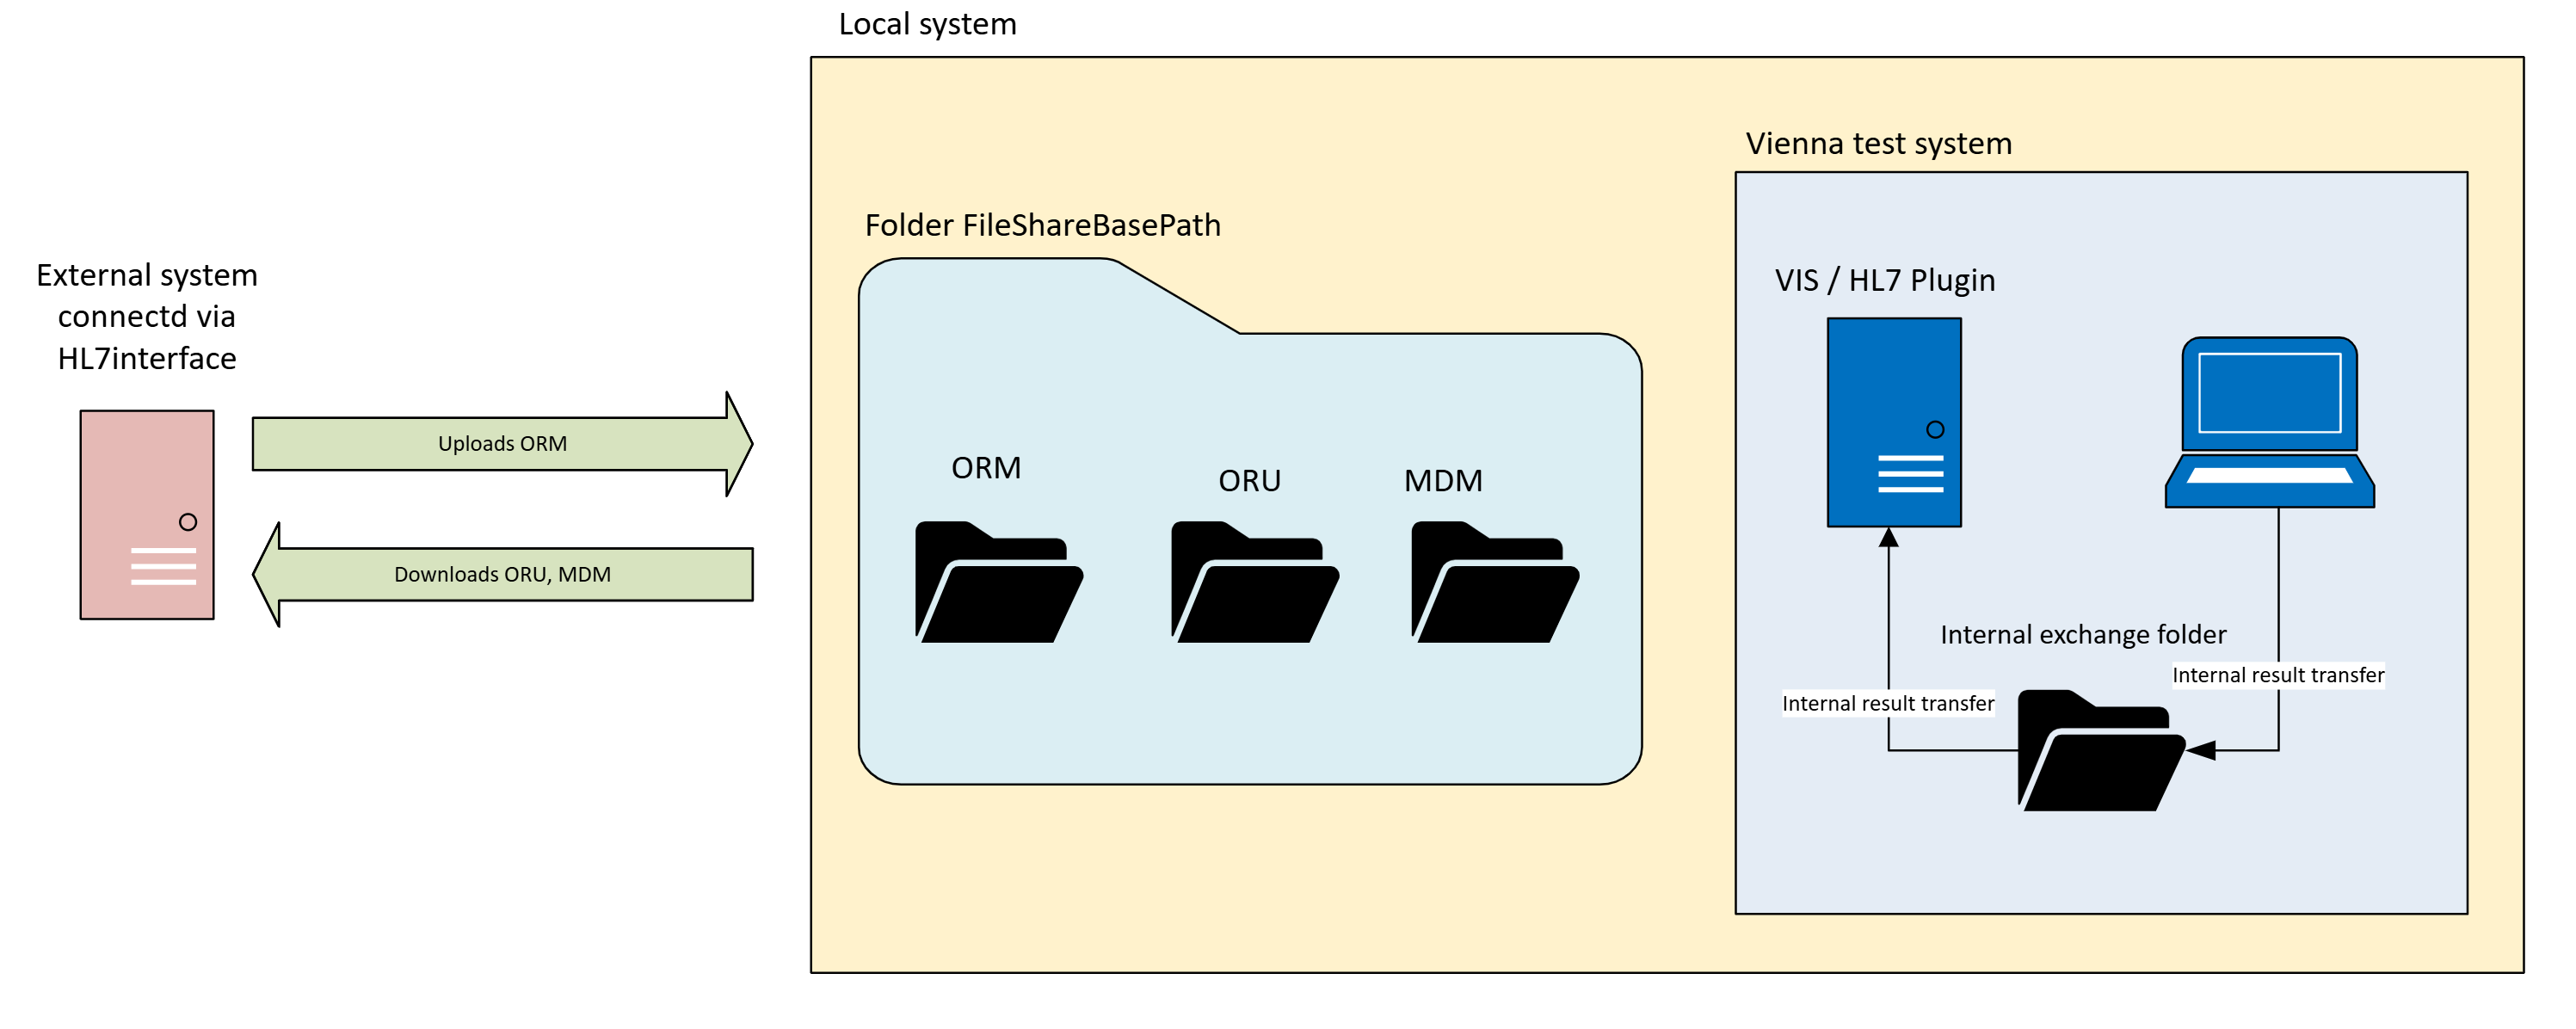
The data exchange is possible via a file based interface or over TCP communication, which are here referred to as file-based and TCP-based mode. The core functionality of the HL7 plugin is identical in both file-based and TCP-based mode. The only difference lies in the method of message transmission between the VTS and the connected system.
File-based mode
In file-based mode, the HL7 plugin monitors a folder for incoming ORM messages. When a new file is detected, the plugin processes the message and creates a new person record based on the data contained in the ORM message.
Once a testing is completed, the plugin performs the following actions:
-
If configured, generates an ORU message containing the values of selected test variables.
-
The ORU message is saved into the “ORU” subfolder in the configured
FileShareBasePath
-
-
If configured, generates an MDM message that includes a Base64-encoded PDF
-
The ORU message is saved into the “MDM” subfolder in the configured
FileShareBasePath
-
This workflow ensures that both structured data (via ORU) and document-based results (via MDM) are consistently exported and available for integration with external systems.
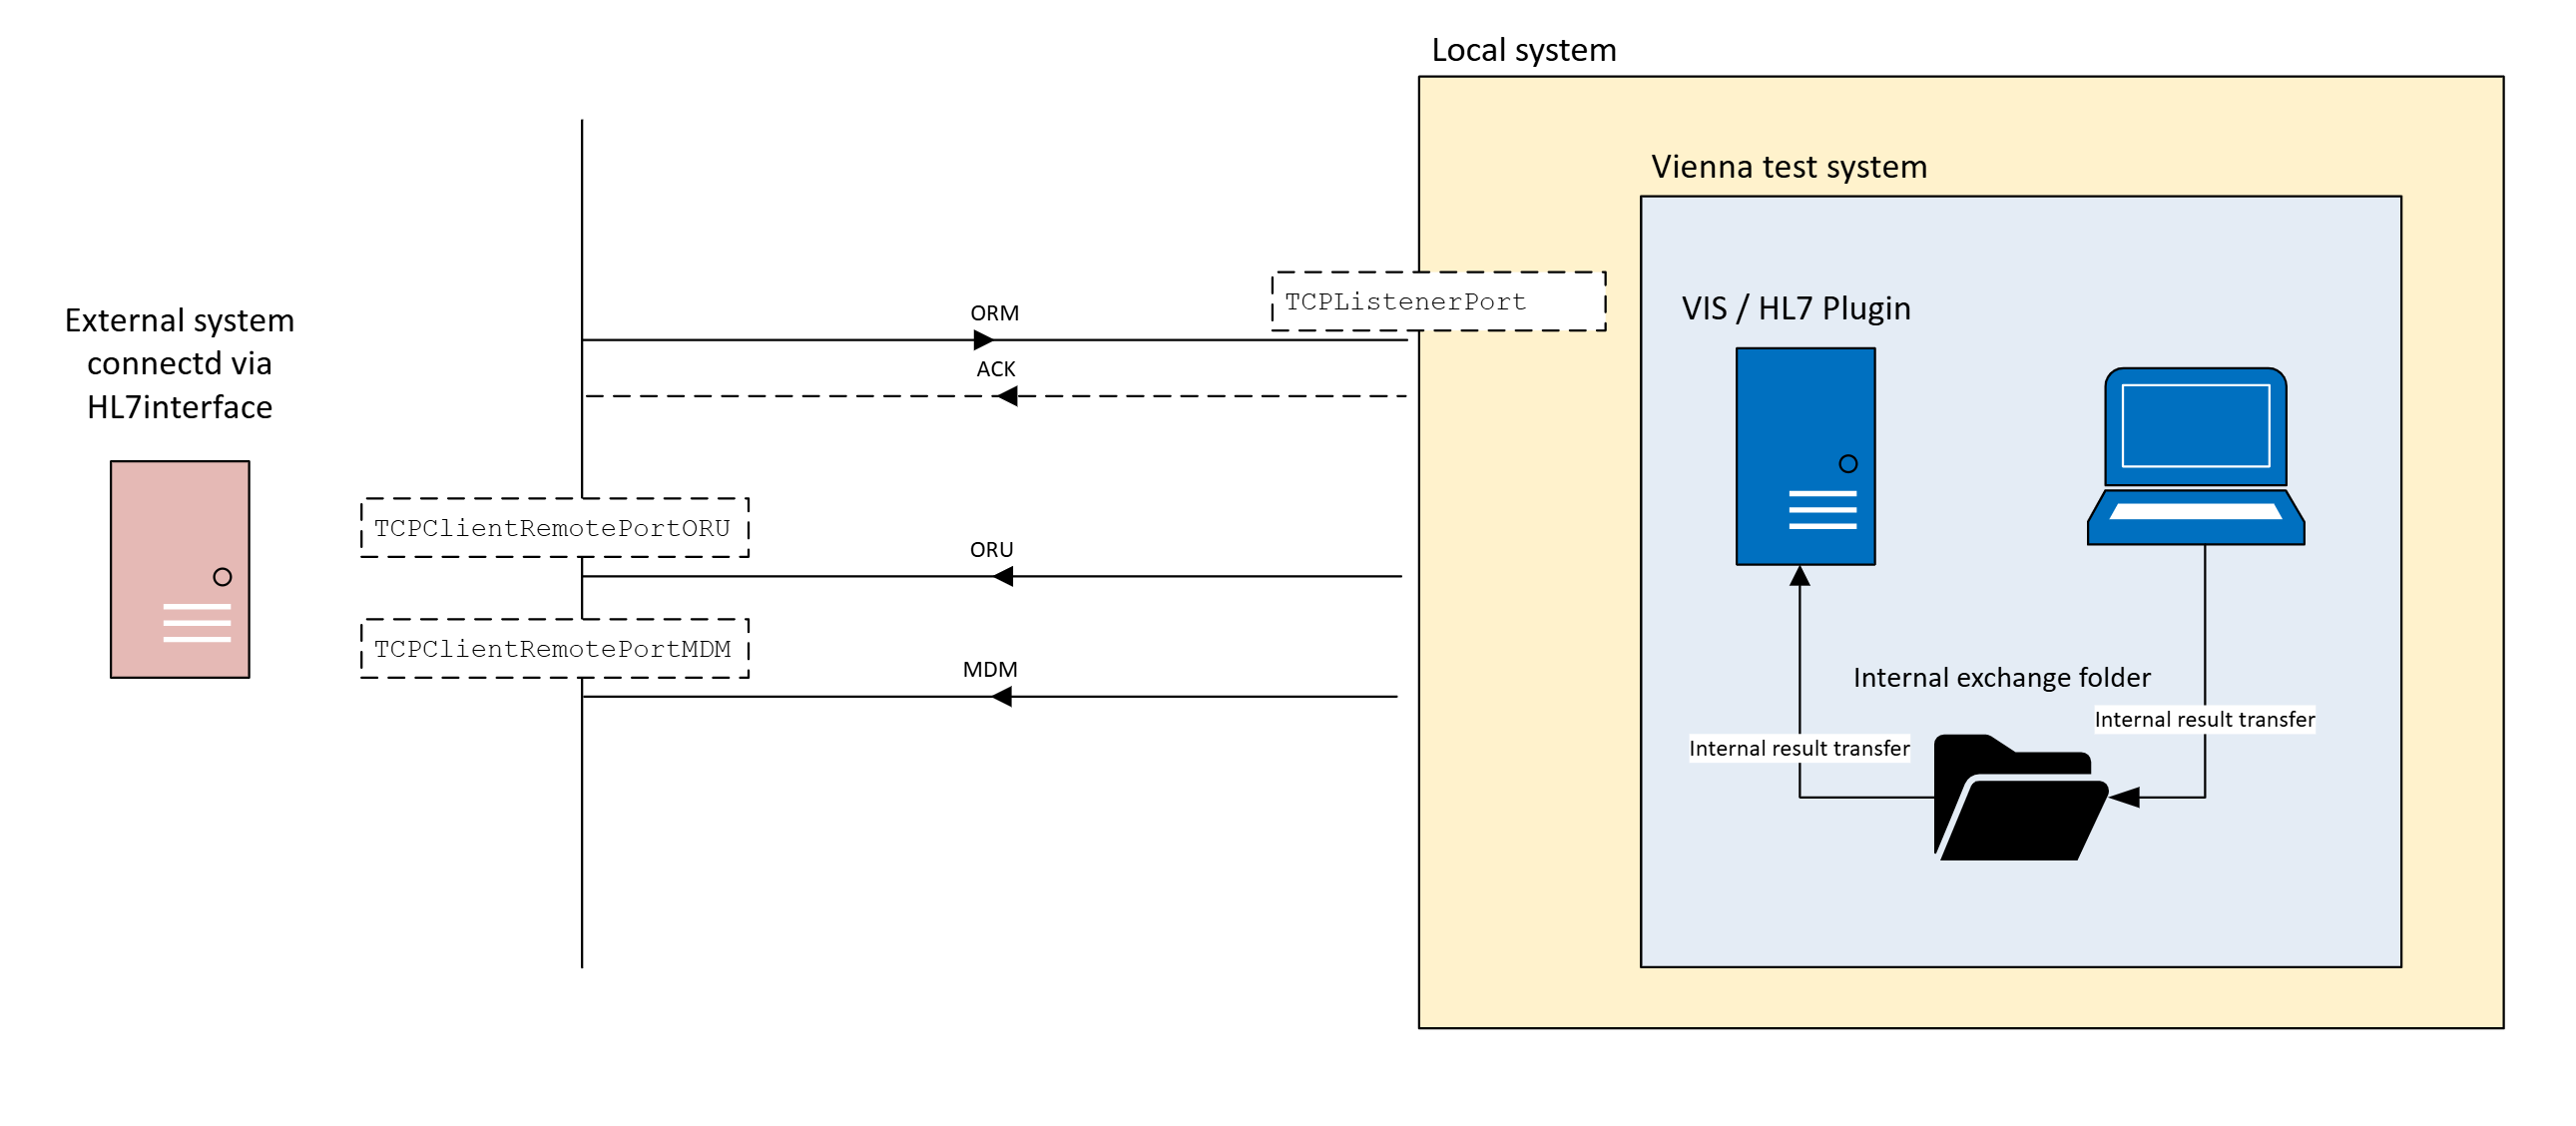
TCP-based mode
In TCP-based mode, the HL7 plugin listens on a predefined port for incoming ORM messages. Upon receiving and processing a message, the plugin will, depending on the configuration, either send an ACK message with a status response or proceed without acknowledgment. If the incoming ORM message meets all required criteria, a new person record is created and becomes available for testing.
Once a testing is completed, the plugin performs the following actions:
-
If configured, generates an ORU message containing the values of selected test variables.
-
Sends the ORU message over TCP connection to predefined address and port
-
-
If configured, generates an MDM message that includes a Base64-encoded PDF
-
Sends the MDM message over TCP connection to predefined address and port
-
This workflow ensures that both structured data (via ORU) and document-based results (via MDM) are consistently exported and available for integration with external systems.
Setup and configuration
For the HL7 interface to function correctly, the HL7 plugin must be configured in the VIS settings file. Additionally, configuration through the old design of the VTS is required to set up the CSV export profile for data transmitted via the ORU message, as well as to configure the PDF file sent with the MDM message. This PDF may either contain the result directly or a result generated from a Word-report template. Here is a short step by step guide on how to configure a minimal working HL7 setup using file-based mode. For advanced options please refer to the sections below.
1. Adapt the VIS settings file
The HL7 plugin must be enabled and configured in the settings file of the VIS, by default located in %PROGRAMFILES%\SCHUHFRIED GmbH\Vienna Test System 8\IntegrationService\appsettings.json
Note: This is the default installation path. If the Vienna Test System was installed to a different location, the actual path may vary accordingly.
This file contains the configuration of all available VIS plugins. All settings relevant to the HL7 plugin can be found under the section starting with “HL7Plugin”.
"HL7Plugin": {
  //...
}
1.1. Enable the HL7 plugin
In order to enable the HL7 plugin, change the value of the Enabled property to true.
"Enabled": "true",
1.2. Configure a file share path
The file-based data exchange facilitates a directory for exchanging the various messages. The path to this directory must be set via the FileShareBasePath setting. The directory specified must exist and be accessible both by the VIS as well as the external system that you want to connect to (e.g. your KIS).
Note: Since the configuration is in a JSON file, all backslashes (“\”) must be escaped (“\\”). The use of network drives is possible, but Windows filesystem restrictions require that the logon account of the “WTS Service” has access to the chosen location. By default, the “Local System Account” is configured, which usually does not have such access.
Example
1.3. Apply changes
After saving changes to the settings file, you must restart the Windows service “WTS Service” for the system to apply the updates and load the plugin with the new configuration. If you are unsure how to restart a Windows service, you may also reboot your machine.
2. Configuration in the Vienna Test System Client
Now that the HL7 plugin is configured, the VTS must be configured accordingly. The following settings must be configured in the “Settings” tab of the Vienna Test System Client (old design). Please note that those settings are currently only available in the old design of the Client, you may need to switch to it to access them.
-
Configuration of folder for internal data export
-
Configuration of Person database, so that it contains necessary fields
-
If ORU message is desired, configuration of variables transmitted in the ORU message
-
If MDM message is desired, configuration of type of file transmitted in the MDM message
2.1. Configuration of folder for internal data export
Go to Settings → Data export / import → Default Folder for data export and use the folder selector to choose the directory where the VTS will export the test results.
This folder serves as the internal exchange location for transferring data between the VTS and the HL7 plugin and can be set to any directory of your choosing.
2.2. Configuration of Person database
-
Navigate to Settings → Person Management → Person database and click on the Define button.
-
In the opened "Define person database" window, ensure that the following fields are selected in the right-hand panel of the selector:
-
Personal ID
-
Test battery for Direct Testing
-
Comments
-
-
If any of these fields are not already selected, add them from the list of available fields on the left-hand side.
-
Additional fields may also be selected. While they do not interfere with the functionality of the HL7 plugin, they will not be included in the exported data.
-
-
Click OK to save the changes.
2.3. Configuration for the ORU message
The ORU message includes values of test variables that can be freely defined. To configure which variables should be exported, follow these steps:
-
Navigate to Settings → Data export / import.
-
Click "Open Management" under "Manage export settings".
-
In the "Export Definitions of Results" window, click "New" to create a new export definition.
-
You may assign any name to the new export definition.
-
-
Select the newly created export definition from the list and configure it as follows:
-
Delete all default entries related to personal data export:
-
Person’s Name
-
Date of birth
-
Test duration in minutes
-
Education level
-
Gender
-
-
From the "Person database fields" panel, add the "Comment" field and ensure it remains the first entry in the table.
-
Enable the checkbox "Export testing date".
-
-
After configuring the mandatory fields, select any additional test variables you wish to export from the "Selection" panel on the right side of the window.
-
Once your selection is complete, click "Save" to save the export profile and close the window.
-
Navigate to Settings → Direct Testing → Scoring.
-
In the "Automatic data export" dropdown, select the name of the export profile you created in steps 3–6 above.
-
Click Save to apply the changes.
-
-
Navigate to Settings → Test Results Output → Additional Options.
-
In the "Automatic data export after test presentation" dropdown, select the name of the export profile you created in steps 3–6 above.
-
Click the Save button to apply the changes.
-
2.4 Configuration for the MDM message
The MDM message can be used to export one of the following PDF files, but not both at the same time”
-
A PDF containing the test result, or
-
A PDF generated from a Word report template.
The required configuration depends on which export format you intend to use.
-
Navigate to Settings → Direct Testing → Scoring.
-
In the "Automatic file name" dropdown, select:
3 - Personal ID and unique test ID -
In the "Preferred scoring method" dropdown, select the scoring method to be used.
-
To export test results as PDF files:
-
In the "Automatic test results output" dropdown, select:
2 - Save the test results automatically as PDF file in the folder for data export -
If you do not wish to export results as PDF, skip this step.
-
-
To export a PDF generated from a Word report template:
-
In the "Automatic report generation" dropdown, select:
2 - Save the report automatically as PDF file in the folder for data export -
In the "Default report template" dropdown, select the desired Word report template.
-
If you do not wish to export results as PDF, skip this step.
-
-
Click Save to apply the changes.
-
Navigate to Settings → Test Results Output → Automation Options.
-
In the "Automatic file name" dropdown, select:
3 - Personal ID and unique test ID -
To export test results as PDF files:
-
Check the box for "Automatic test results output".
-
If you do not wish to export results as PDF, skip this step.
-
-
To export a PDF generated from a Word report template:
-
Check the box for "Automatic report generation".
-
In the "Default report template" dropdown, select the desired Word report template.
-
If you do not wish to export results as PDF, skip this step.
-
-
Click Save to confirm and apply the settings.
3. Test your setup
3.1. Import
Place an example HL7 ORM file into the configured FileShareBasePath in the “ORM” subdirectory. After a short time, it should be detected, processed and deleted by the VIS plugin. Verify that the person was correctly created.
See HL7 plugin - minimal_orm_message for an example input file.
3.2. Export
Administer a test, test set or test battery for which an export definition is configured. After the testing is completed, an ORM and MDM output file should appear in the configured FileShareBasePath in the respective subdirectories.
3.3. Troubleshooting
In all cases, you may check the log files for information about possible issues (see HL7 plugin - logging)
-
Input files are not processed
-
Make sure the configured directories are spelled exactly as required
-
Ensure you have a valid VTS license for the VIS service
-
Ensure the “WTS Service” has been restarted and all settings are correctly applied
-
-
Input files are processed but no persons get created (or not correctly)
-
The input files could contain invalid or unsupported data
-
Make sure input files are encoded in UTF-8
-
-
In case of TCP-based mode: No connection can be made to the service or no outputs are delivered
-
Make sure all configured ports are reachable and accessible through the firewall
-
The configured ports must not be occupied by other services
-
-
No output files are created
-
Revisit the ORU and MDM settings in the VTS client
-
Ensure the “WTS Service” has been restarted and all settings are correctly applied
-
Further information and reference
The following sections contain more detailed information about the various topics related to the HL7 plugin and its functionality.
VIS settings file
The HL7 plugin must be enabled and configured in the settings file of the VIS, by default located in %PROGRAMFILES%\SCHUHFRIED GmbH\Vienna Test System 8\IntegrationService\appsettings.json
Note: This is the default installation path. If the Vienna Test System was installed to a different location, the actual path may vary accordingly.
This file contains the configuration of all available VIS plugins. All settings relevant to the HL7 plugin can be found under the section starting with “HL7Plugin”.
Settings reference
|
Field |
Description |
Note |
|---|---|---|
|
Defines if the plugin is enabled and should be started. |
Must be set to |
|
Value used for MSH-5 Receiving application |
Modify only if needed. |
|
Value used for MSH-6 Receiving facility |
Modify only if needed. |
|
Value used for MSH-3 Sending application |
Modify only if needed. |
|
Value used for MSH-4 Sending facility |
Modify only if needed. |
|
Configuration if File-based or TCP-based mode is used. |
Must be configured. Allowed values:
|
|
Specifies the path to the folder used for exchanging files containing HL7 messages. Dedicated subfolders for ORM, ORU, and MDM messages will be automatically created within this directory. The plugin will read from and write to these subfolders as part of its operation. |
Must be configured if File-based mode is used. |
|
Specifies the IP address or hostname of the system connected through the HL7 interface. This value is required for establishing communication between systems. |
Must be configured if TCP-based mode is used. |
|
Specifies the port on the system connected via the HL7 interface to which the HL7 plugin sends ORU messages over a TCP connection. |
Must be configured if TCP-based mode is used. |
|
Specifies the port on the system connected via the HL7 interface to which the HL7 plugin sends MDM messages over a TCP connection. |
Must be configured if TCP-based mode is used. |
|
Specifies the port on the local system running VIS where the HL7 plugin listens for incoming ORM messages transmitted over a TCP connection. |
Must be configured if TCP-based mode is used. |
|
Specifies the timeout value, in milliseconds, for sending messages to the host. If the HL7 plugin is unable to complete the transmission within this time, the send operation will be cancelled. |
Modify only if needed. |
|
Determines whether the HL7 plugin sends an ACK (acknowledgment) message after receiving and processing an incoming ORM message. The ACK message includes information indicating whether the processing was successful and is sent over the same TCP connection. |
Modify only if needed. Allowed values:
|
|
Specifies the value assigned to the TXA-2 (Document Type) field within the MDM message. This value can be any string up to a maximum length of 30 characters." |
Modify only if needed. |
|
Specifies the value assigned to the TXA-17 (Document Completion Status) field within the MDM message. The value indicates the completion status of the document and therefore should conform to HL7-defined codes. |
Modify only if needed. |
|
Specifies the value assigned to the OBX-3 (Observation identifier) used in the MDM message. |
Modify only if needed. |
|
Specifies multi-client (e.g. V12345_001) where plugin imports persons. |
Must be configured. |
|
Language used for the imported persons. |
Must be configured. Language code in BCP 47 format. E.g. de-DE for German, en-US for English. |
Example
Input ORM message
The input ORM message with personal data to import should contain following segments: MSH, PID, PV1, ORC, OBR, OBX. The message consists of several segments, each segment must start with the field identifier and be terminated using the Carriage Return (CR) character (0x0D).
The input message must be encoded in UTF-8. Using any other encoding may result in incorrect handling of names containing special or national characters, and proper data processing cannot be guaranteed.
In file-mode, the input files must have the extension *.hl7. Otherwise, they will not be processed.
Supported ORM fields
|
Field in ORM message |
Filed in VTS |
Note |
|---|---|---|
|
MSH-6 |
|
Multi-client. Used to identify mandant where person is imported |
|
MSH-9 |
|
Message type. Must contain |
|
PID-5.1 |
Last name |
|
|
PID-5.2 |
First name |
|
|
PID-7 |
Date of birth |
In format YYYYMMDD |
|
PID-8 |
Gender |
M for Male. F for Female. |
|
PV1 – Patient Visit segment |
|
Segment PV1 must be present in the message. No data are loaded from the segment. |
|
ORC-2.1 |
Personal ID |
Numerical number between 1 and
|
|
OBR-4.1 |
Test battery for Direct Testing |
|
|
OBX-2 |
|
Supported values |
|
OBX-5 |
Education level |
Optional Numerical value between 0 and 5.
Education level will be set to "? - Education level unknown" if not provided. |
Example of the minimal ORM message
MSH|^~\&||||IncLic_001|||ORM^any_text||||||||
PID|||||Mustermann^Max||19900418|M|||
PV1|||||||||||||||||||||||||||||||||||||||||||||
ORC||123456||||||||||||||||||
OBR||||NameOfTestBattery||||||||||||||||||||||||||||||||||||||||
OBX||ED|||1||||||
Example file for download: ORM_file.hl7
Acknowledgment message ACK
When configured, the HL7 plugin returns an ACK (Acknowledgment) message upon successful receipt and processing of an ORM message.
The MSA-1 segment of the ACK message will contain:
-
'AA'(Application Accept) if the message was successfully processed. -
'AR'(Application Reject) if the message was not successfully processed.
MSH|^~\&|WTS|WTS|KIS|ORBIS|20250617091651||ACK^O01^ACK|638857486118860565|P|2.5|||NE|NE|NE
MSA|AA|MSGWTS202100000001
Output ORU message
ORU message contains following segments: MSH, PID, PV1, ORC, OBR and OBX for each exported variable.
Structure of MSH segment:
MSH-2  Fixed value: ^~\&
MSH-3  Value of SendingApplication from config file
MSH-4  Value of SendingFacility from config file
MSH-5  Value of ReceivingApplication from config file
MSH-6  Value of ReceivingFacility from config file
MSH-7  Date time of the message. Format YYYYMMDDHHMMSS
MSH-9  ORU^R01
MSH-10 Unique message ID
MSH-11 P
MSH-12 2.5
MSH-15 NE
MSH-16 NE
MSH-17 NE
The PID, PV1, and ORC segments are exact copies of the corresponding segments from the incoming ORM message, containing the personal data of the imported person.
The OBR segment contains name of the taken test battery for direct testing on position OBR-4 and date of the test presentation on position OBR-6.
For each exported variable is one OBX segment created. OBX segments have the following structure:
OBX-1  Sequential increasing ID
OBX-2  NM - Numeric
OBX-3  Name of the exported variable
OBX-5  Value of the variable
OBX-11 F - Fianal result
OBX-14 - Date time of the observation in format YYYYMMDD
Example of the ORU message
MSH|^~\&|WTS|WTS|KIS|ORBIS|20250529121752||ORU^R01|638841178723625157|P|2.5|||NE|NE|NE
PID|||||Mustermann^Max||19900418|M|||
PV1|||||||||||||||||||||||||||||||||||||||||||||
ORC||123456||||||||||||||||||
OBR||||NameOfTestBattery||20250529||||||||||||||||||||||||||||||||||||||
OBX|0|NM|PRIO/S1 RawScore - A - Raw score Artistic interests (A)||893||||||F|||20250529|||
OBX|1|NM|PRIO/S1 RawScore - C - Raw score Conventional interests (C)||908||||||F|||20250529|||
Output MDM message
MDM message contains following segments: MSH, EVN, PID, PV1, TXA and OBX containing exported pdf with base 64 encoding.
Structure of MSH segment:
MSH-2  Fixed value: ^~\&
MSH-3  Value of SendingApplication from config file
MSH-4  Value of SendingFacility from config file
MSH-5  Value of ReceivingApplication from config file
MSH-6  Value of ReceivingFacility from config file
MSH-7  Date time of the message. Format YYYYMMDDHHMMSS
MSH-9  ORU^R01
MSH-10 Unique message ID
MSH-11 P
MSH-12 2.5
MSH-15 NE
MSH-16 NE
MSH-17 NE
Structure of EVN segment:
EVN-1 Fixed value T02
EVN-2 Date time of the message. Format YYYYMMDDHHMM
EVN-3 Date time of the message. Format YYYYMMDDHHMM
The PID and PV1 segments are exact copies of the corresponding segments from the incoming ORM message, containing the personal data of the imported person.
Structure of TXA segment:
TXA-1  Fixed value 1
TXA-2  Value of TXA2DocumentType from config file
TXA-3  Fixed value application/pdf
TXA-8  Date time of the message. Format YYYYMMDDHHMM
TXA-12 Name of the exported pdf file with ^WTS suffix
TXA-16 Name of the exported pdf file
TXA-17 Value of TXA17DocumentCompletitionStatus from config file
Structure of OBX segment:
OBX-1  Fixed value 1
OBX-2  Fixed value ED
OBX-5  PDF in base 64 encoding with fixed format WTS^application^pdf^Base64^[PdfFileInBase64Encoding]
OBX-11 Fixed value F
OBX-14 Date time of the obesrvation in format YYYYMMDDHHMMSS
Example of the MDM message
MSH|^~\&|WTx|WT2x|KIx|ORBIx|20250529122932||MDM^T02^MDM_T02|638841185728576710|P|2.5|||NE|NE|NE
EVN|T02|202505291229|202505291229
PID|||||Mustermann^Max||19900418|M|||
PV1|||||||||||||||||||||||||||||||||||||||||||||
TXA|1|Report|application/pdf|||||202505291229||||21000008_7ad50946-ecd4-4e04-8d3c-96bac437cc34.pdf^WTS||||21000008_7ad50946-ecd4-4e04-8d3c-96bac437cc34.pdf|AU
OBX|1|ED|||WTS^application^pdf^Base64^[PdfFileInBase64Encoding]||||||F|||20250529121738|||
Line separators
In the generated files, each line is terminated using the Carriage Return (CR) character (0x0D).
When messages are transmitted over TCP using the Minimal Lower Layer Protocol (MLLP):
-
A Vertical Tab (VT) character (
0x0B) is added at the beginning of the message. -
A combination of File Separator (FS) and Carriage Return (CR) characters (
0x1C 0x0D) is appended at the end of the message
Logging
The VIS and HL7 plugin generate log data that can be used to analyze their functionality. This data is recorded in the following log files:
C:\ProgramData\Schuhfried\Logs\VTS.Integration.Service.log
Please note: The directory “C:\ProgramData” is hidden by default. You can either make hidden items visible in your Windows Explorer or simply paste the path to the file into its address bar.
Limitations
Test results can only be transmitted for persons who were imported into the system via the HL7 interface. Results for persons who were created manually or who already existed in the system prior to HL7 import will not be exported.