Communication between clients and servers is implemented in VTS 8 using the standardized Microsoft technology Windows Communication Foundation WCF. WCF offers several options for securing communication. The version used as standard in VTS ensures confidentiality, integrity, and authentication end-to-end between clients and servers (“message” security). This version is implemented at the application level and uses AES-256 for encryption (https://docs.microsoft.com/en-us/dotnet/framework/configure-apps/file-schema/wcf/message-of-wshttpbinding).
Additional information on WCF Security can be found here: https://docs.microsoft.com/en-us/dotnet/framework/wcf/feature-details/security-overview
The other APIs are hosted with the HTTPS protocol by default, using a self-signed, trusted SSL certificate.
By default, VTS always uses encrypted communication. The necessary certificates are generated automatically.
Using your own HTTPS certificate
To use your own HTTPS certificate, installation can be carried out via the command line: Silent installation via command line. Manual configuration afterwards is possible, but not recommended.
Currently, only valid RSA certificates (2048-bit) can be used.
Installing the certificate via the command line
Starting with VTS version 8.26, the setup program also supports the installation of your own certificates, which are transferred via command line options. To do this, the installation command must be extended with the following parameters:
-
EXISTING_CERTIFICATE_SUBJECT: Common Name (CN) of the certificate subject of a certificate stored in
LocalComputer/Personal windows certificate store. -
EXISTING_CERTIFICATE_THUMBPRINT: Thumbprint of the certificate subject of a certificate stored in
LocalComputer/Personal windows certificate store.
In both cases (provided that the installation program does not find any invalid certificates), the certificate must contain a private key with a length of at least 2048 bits.
The installation program configures the certificate and links it to the required ports.
For details on installation via command line, see: Silent installation via command line
Automatic certificate configuration with VTSCommand.exe
Since VTS version 8.27, you can automatically reconfigure the SSL/TLS/encryption/signing X509 certificate for all VTS components using the binary command line tool VTSCommand.exe. The command line tool can be found in the AdminClient subfolder of the VTS installation folder (Default: %programfiles%\SCHUHFRIED GmbH\Vienna Test System 8 Client\AdminClient).
The binary command line tool must be executed in a shell with extended rights or as an administrator. The tool can configure the X509 certificate for the entire VTS in two ways:
-
Use an existing certificate in the Windows certificate store of the local computer. To do this, execute the following command in Powershell:
.\VTSCommand.exe -c -k [X509-Certificate-Search-Type] -v [Certificate-Search-Term]
Where:-
[X509-Certificate-Search-Type]: Specifies the type of certificate search. The following values are allowed:FindByThumbprint, FindBySubjectName, FindBySubjectDistinguishedName, FindByIssuerName, FindByIssuerDistinguishedName, FindBySerialNumber, FindByTimeValid, FindByTimeNotYetValid, FindByTimeExpired, FindByTemplateName, FindByApplicationPolicy, FindByCertificatePolicy, FindByExtension, FindByKeyUsage, FindBySubjectKeyIdentifier -
[Certificate-Search-Term]specifies the content of the search. It depends on which[X509-Certificate-Search-Type]you used, e.g. forFindByThumbprint[Certificate-Search-Term]is the thumbprint value of your certificate, e.g. " 993e3fcb87b355fb2a4d954abacbb33ba7f59865 ". ForFindBySubjectName[Certificate-Search-Term]is the common name (CN) part of the certificate subject, e.g. SchuhfriedSelfSignedCertificate. -
Examples:
-
.\VTSCommand.exe -c -k FindByThumbprint -v 993e3fcb87b355fb2a4d954abacbb33ba7f59865 -
.\VTSCommand.exe -c -k FindBySubjectName -v SchuhfriedSelfSignedCertificate
-
-
-
Use a pfx file containing the exported certificate and its private key, as well as the password for opening the file (the certificate from the pfx file will be installed in the local Windows certificate store on your computer). The command is:
.\VTSCommand.exe -c -f [Pfx-Path] -q [Pfx-FilePassword]
Where:-
[Pfx-Path]is the full path to your pfx file including the file name, e.g.c:\users\admin\desktop\mycert.pfx. -
[Pfx-FilePassword]is the password required to read the pfx file -
Example:
.\VTSCommand.exe -c -f c:\users\admin\desktop\mycert.pfx -q myCertPassword.1234
-
Notes
-
You can also simply run the file .\VTSCommand.exe -c to enter all parameters interactively.
-
You can use the -n parameter to remove yes/no questions. In this case, everything will be confirmed automatically.
-
The tool updates the new certificate information in all necessary configuration files of the VTS.
-
The tool backs up all configuration files in the folder C:\ProgramData\Schuhfried\Backup before changing them.
-
During the execution of the tool, the VTS services such as the WTS Service or the VIS (Universal Plugin) are restarted.
Manual installation
In addition to the WTS Service, the VTS contains additional APIs that communicate using the HTTPS protocol. By default, the WTS Service and APIs encrypt their communication with a trusted, self-signed SSL certificate. However, it is possible to use your own SSL certificate issued for the hosted domain. To do so, the following steps are necessary:
-
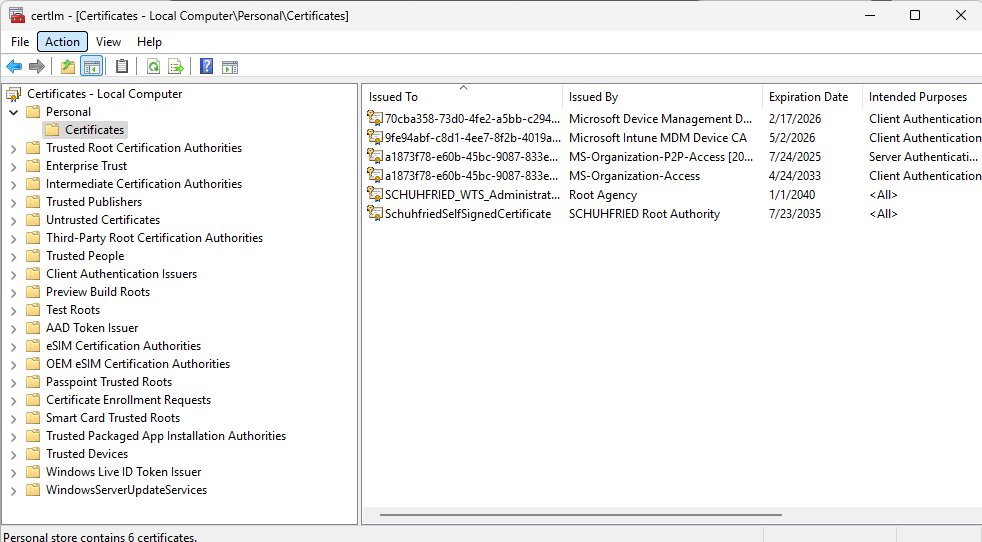
Make sure that your certificate is stored under Personal --> Certificates (Certificates - Local Computer).
-
Replace the default value (
SchuhfriedSelfSignedCertificate) with the name of your own certificate.-
This must be done everywhere in the configuration file where the following key-value pairs are used:
“CertificateSearchValue”: “FindBySubjectName”and“CertificateSearchKind”= “your-certificate-CN”.
-
-
Replace the default value with the name of your own certificate in the following configuration files:
-
Installation path\Service\Service.Wcf\appsettings.json
-
Installation path\Service\Service.Wcf\VTS.Service.Wcf.dll.config
-
Installation path\Api\appsettings.json
-
Installation path\Portal\appsettings.json
-
Installation path\Testplayer.web\appsettings.json
-
Installation path\\Identity\appsettings.json
-
The installation path is by default:
%programfiles%\SCHUHFRIED GmbH\Vienna Test System 8
Example: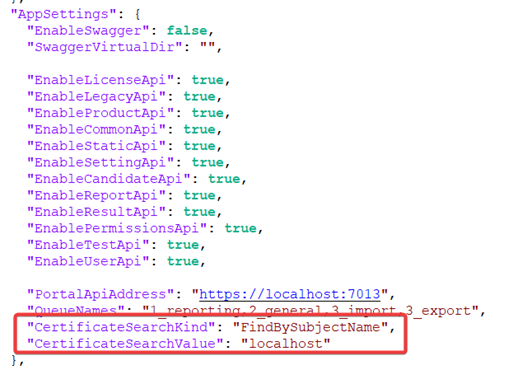
-
-
If changing the certificate applicant (subject) also changes the URL at which the VTS provides the service and APIs, the values in the Client table in the VTS database must be updated with the correct URL. The supplied SQL script
update_identityserverconfiguration.sqlcan be used for this task after the correct URL has been added to the script. The script can be found in the Scripts\Help folder in the installation files. -
Restart the WTS Service.
Configuring the VIS Universal Plugin to use an encrypted connection via HTTPS
The following steps describe how to configure the Universal Plugin to use HTTPS by using the self-signed certificate provided during setup or your own SSL certificate.
The following steps must be performed:
-
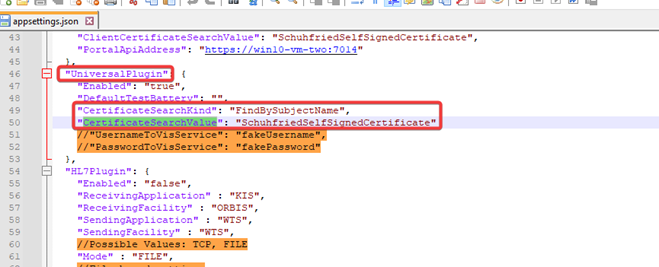
(Optional if you are using your own certificate) Make sure that your certificate is available under Personal → Certificates (Certificates - Local Computer).
-
(Optional if you are using your own certificate) Enter the name (subject) of the certificate in the appsettings.json file in the IntegrationService folder in the installation folder (by default:
%programfiles%\SCHUHFRIED GmbH\Vienna Test System 8\IntegrationService\appsettings.json).-
The change must be made in the UniversalPlugin section by adding the values for CertificateSearchKind and CertificateSearchValue:
-
-
Restart the WTS Service.