The Test Generator can be used to add your own norms to created tests or questionnaires. The prerequisite for this is that a norm table is available. This can be calculated on the basis of existing data (e.g. calculation of percentile ranks for each possible raw score) or transferred from existing norm tables. A norm makes it possible to put the results of a test in relation to a reference sample and is the prerequisite for an unambiguous interpretation of the test result (in norm-oriented diagnostics).
To add a norm to a test, select the Norms option on the main page of the Test Generator in the VTS (see screenshot below).

The norm editor opens. A new norm can be added using the Norm button (see screenshot below).
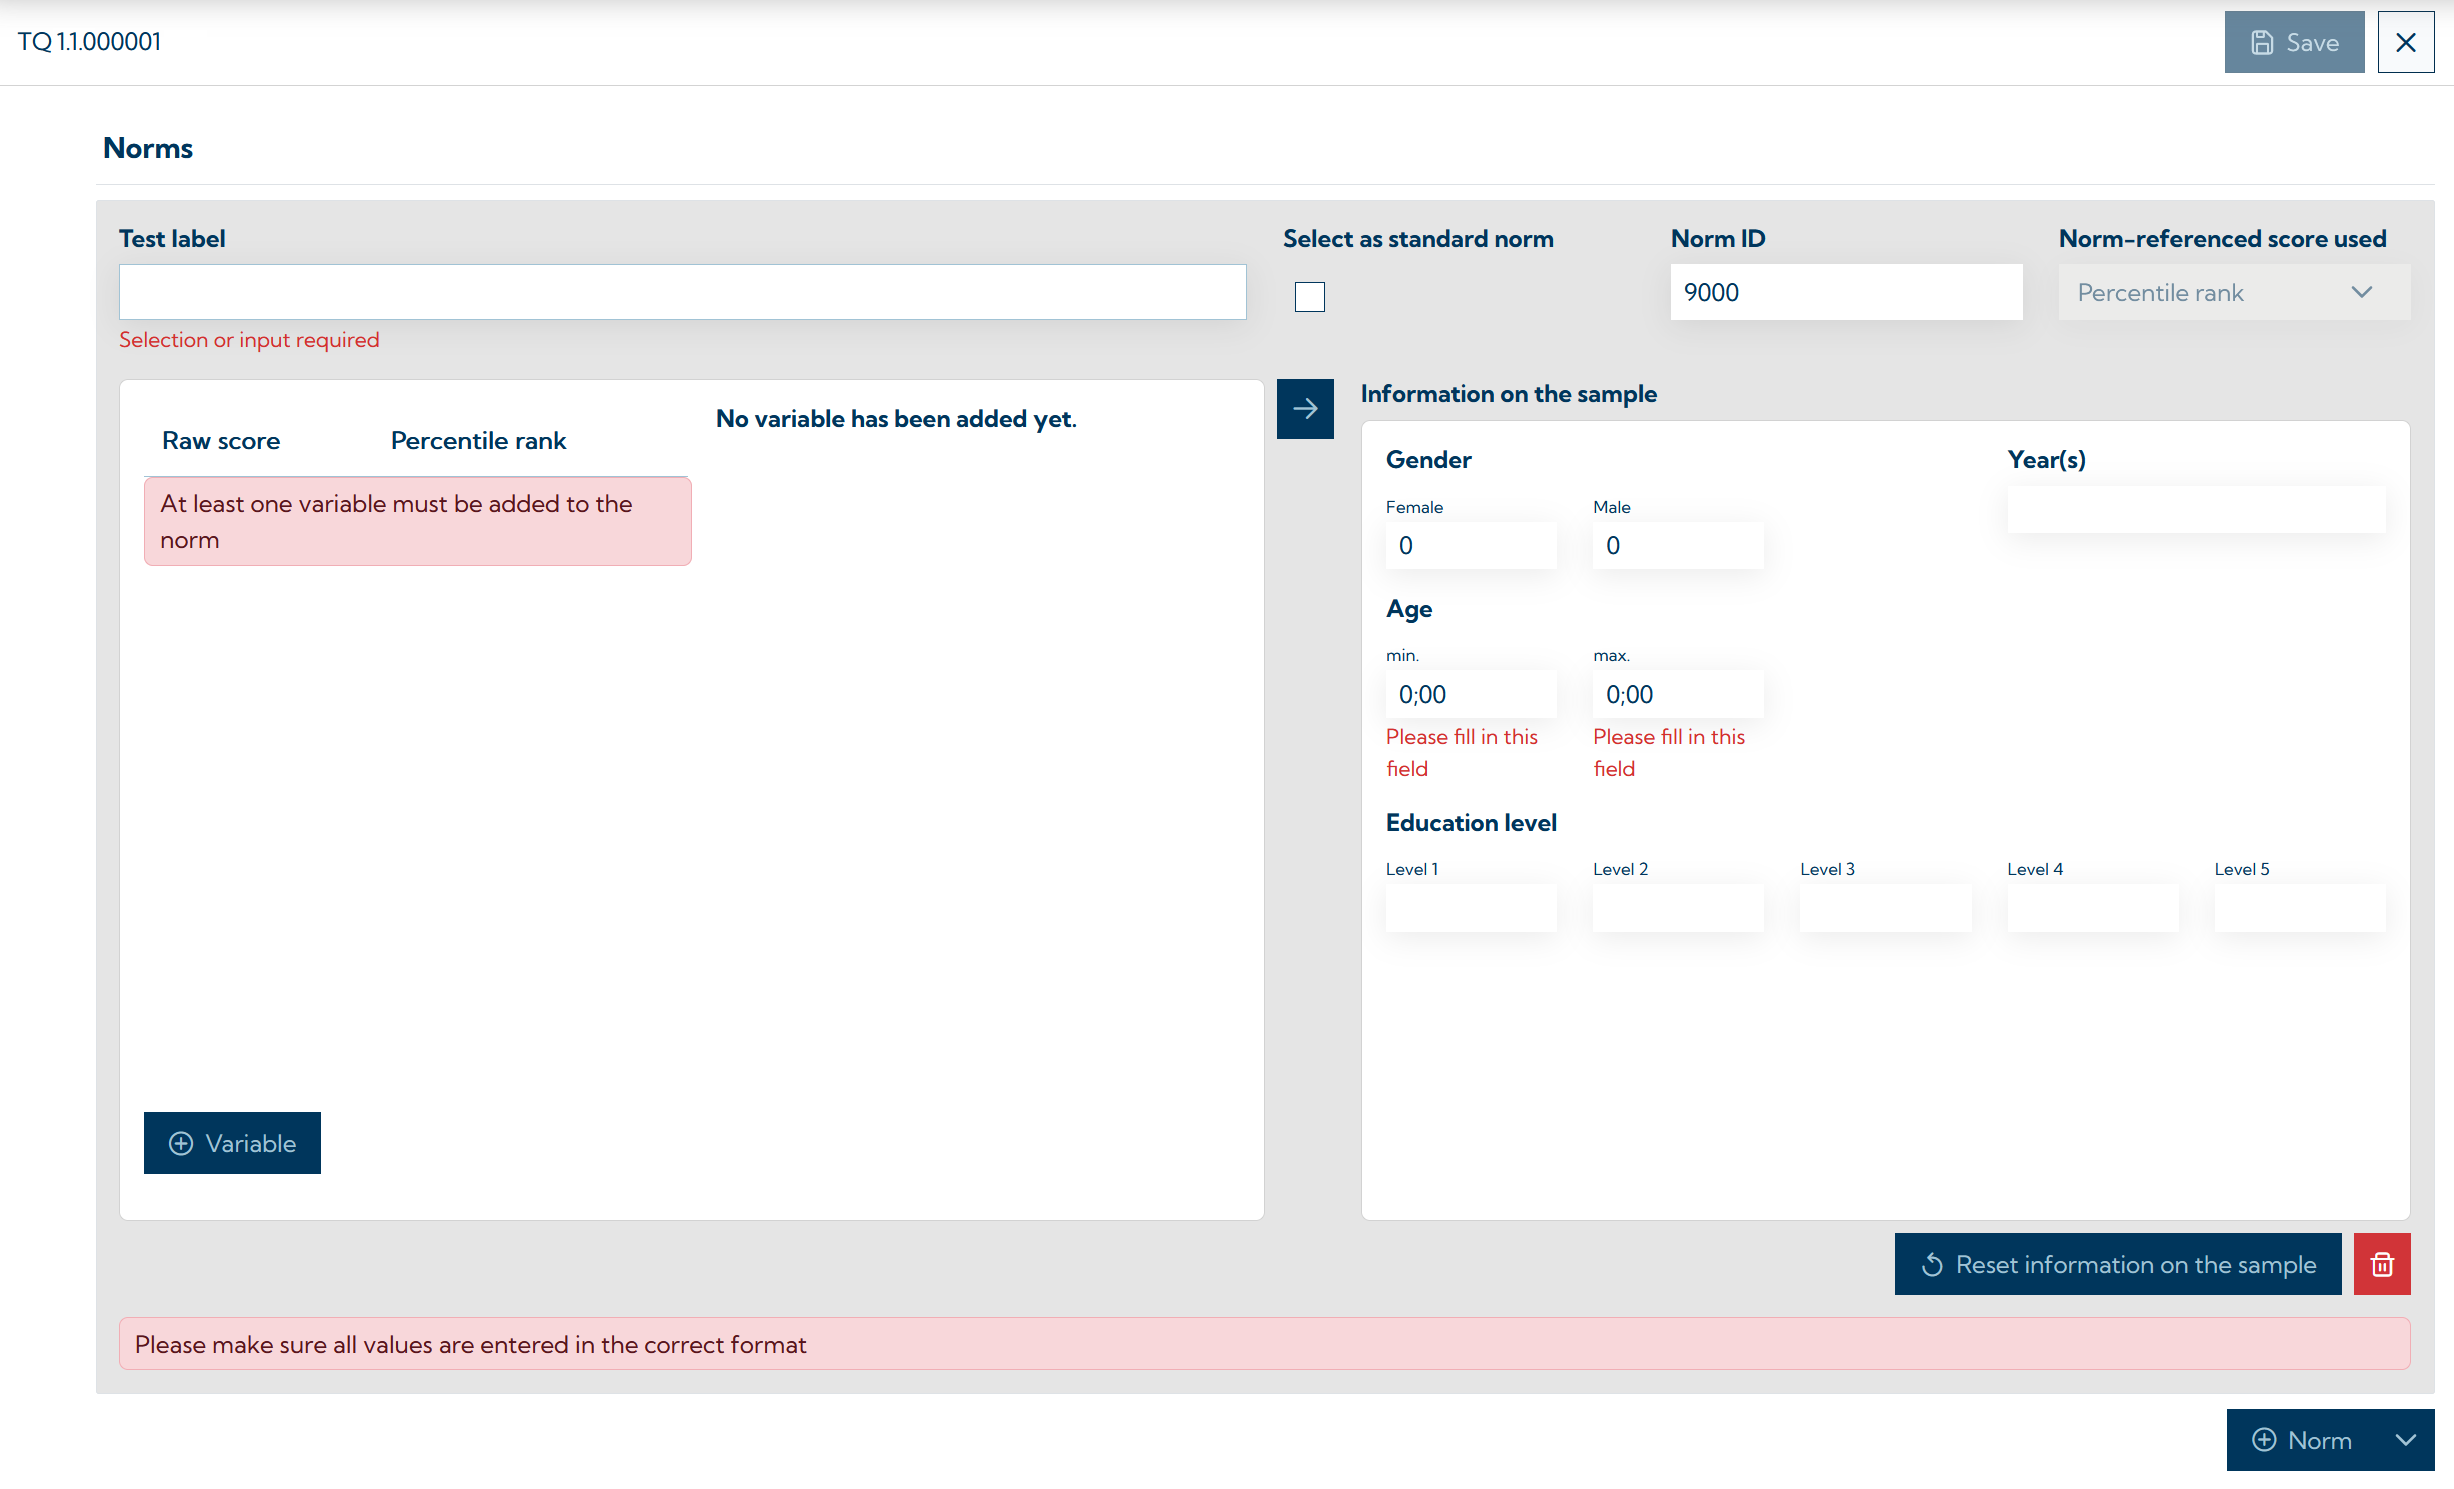
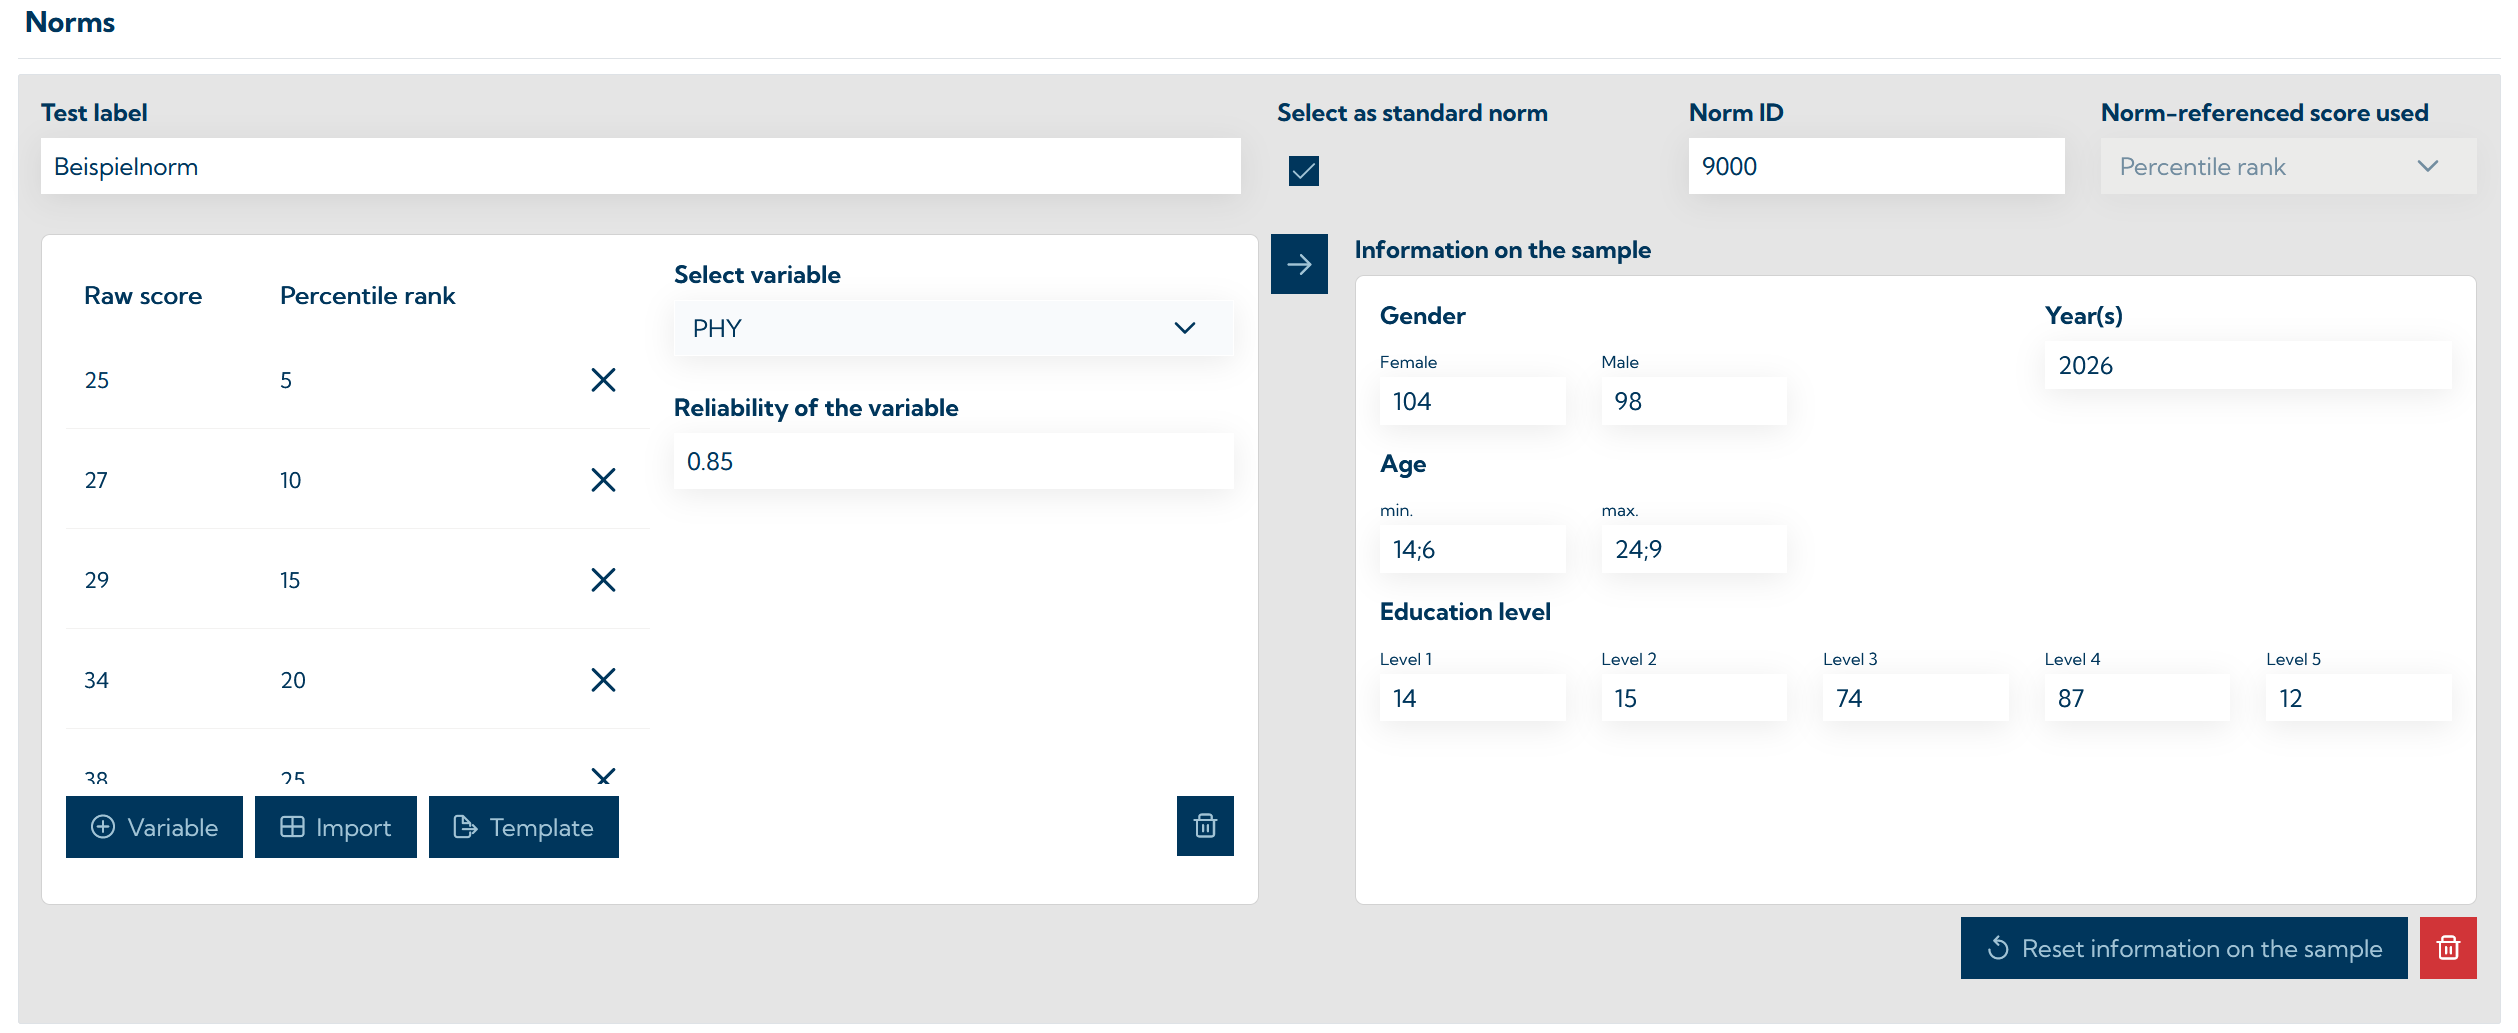
Each norm must be given a Norm label. This gives the norm a name and is displayed in the results report when the norm is used. It is also necessary to assign a norm ID (unique numbering) to each norm. If several norms are available, one norm can be selected as the standard norm, which is used for norming unless the user selects a different norm. In addition, the type of norm-referenced score can be selected in the norm-referenced score used field (e.g. percentile rank).
Attention: Currently, only norms based on percentile ranks are supported in the norm editor. If norm-referenced scores with a different value range are used, this may result in incorrect scoring and display.
For each norm, information on the composition of the sample on the basis of which the norm-referenced scores were determined should be provided in the sample information section. For each norm, at least the minimum and maximum age of the persons in the norm sample must be stated. The format is year;month (e.g.: 14;6). In addition, the number of men and women in the sample, the year in which the sample was collected, and the distribution of education levels can be specified. The education levels follow the logic of the VTS: 1 = No school leaving certificate (less than 9 years of schooling) or special school, 2 = Compulsory schooling or intermediate secondary school completed (9-10 years of schooling), 3 = Vocational school or vocational training completed (10-12 years of training), 4 = Secondary school completed with A-levels (12-13 years of training), 5 = University or college degree.
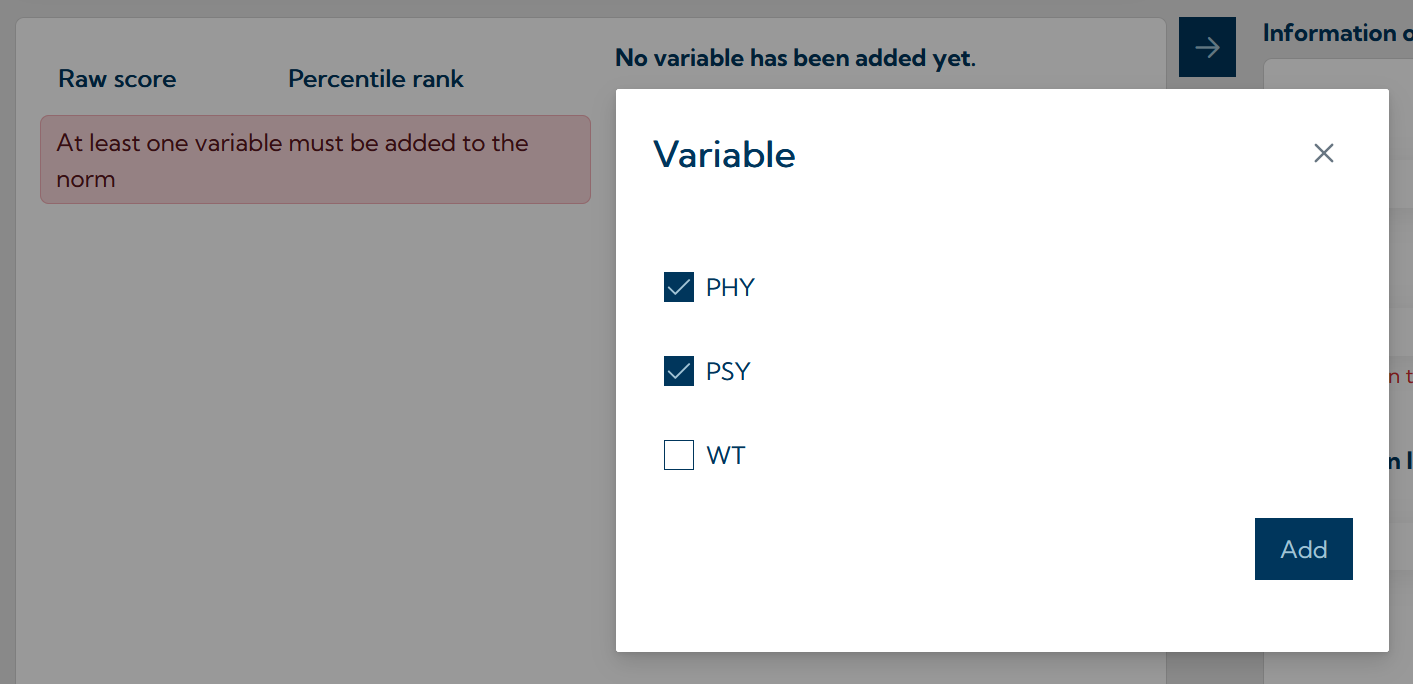
To add norm-referenced scores, the first step is to select the variables for which norm-referenced scores are to be added using the Variable button (see screenshot below).
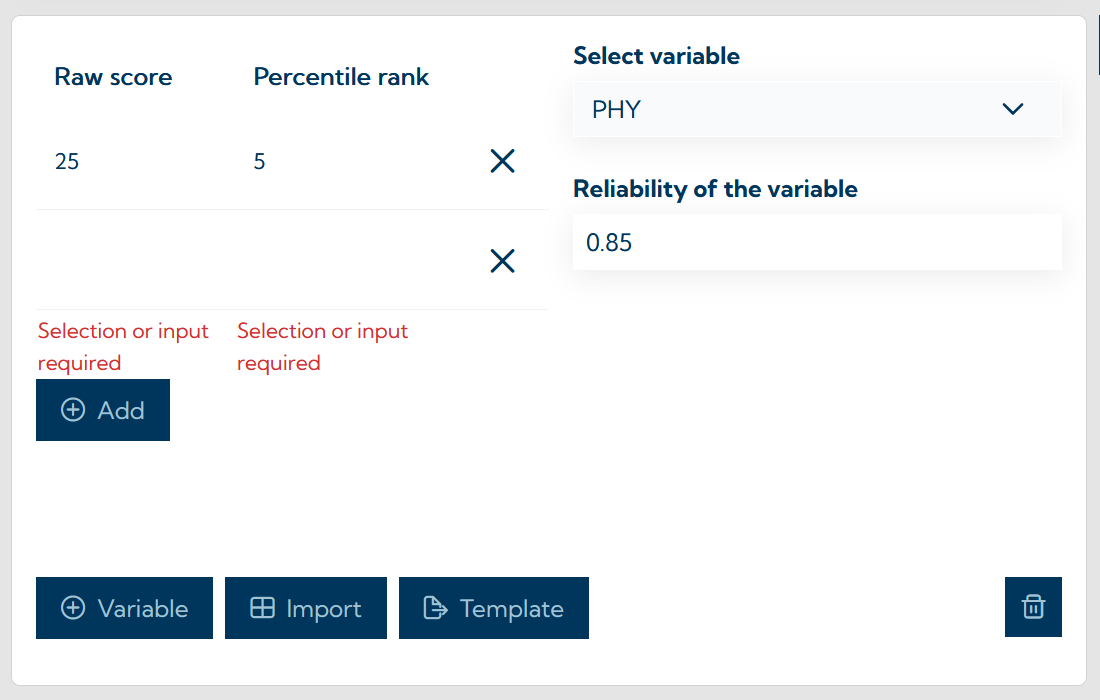
A variable can then be selected on the left-hand side of the norm editor and the raw score - norm score mapping can be entered. To do this, a row must be added to the table for each pair of values by clicking the Add button and then the raw score and the corresponding norm value must be entered (see screenshot below).
An example of a fully entered norm can be found in the screenshot below. The raw scores that need to be entered depend on the individual settings of the test and the calculation of the variables (defines the range of values) as well as the actual empirical distribution of values in the sample on the basis of which the norm-referenced scores were determined.
The reliability (e.g. internal consistency) can also be specified for each variable, provided this is known. If a reliability is available for a standardized variable, confidence intervals for the norm-referenced scores are automatically output in the results report. Permitted values range from 0.01 to 0.99.
Import of norm-referenced scores via .csv file
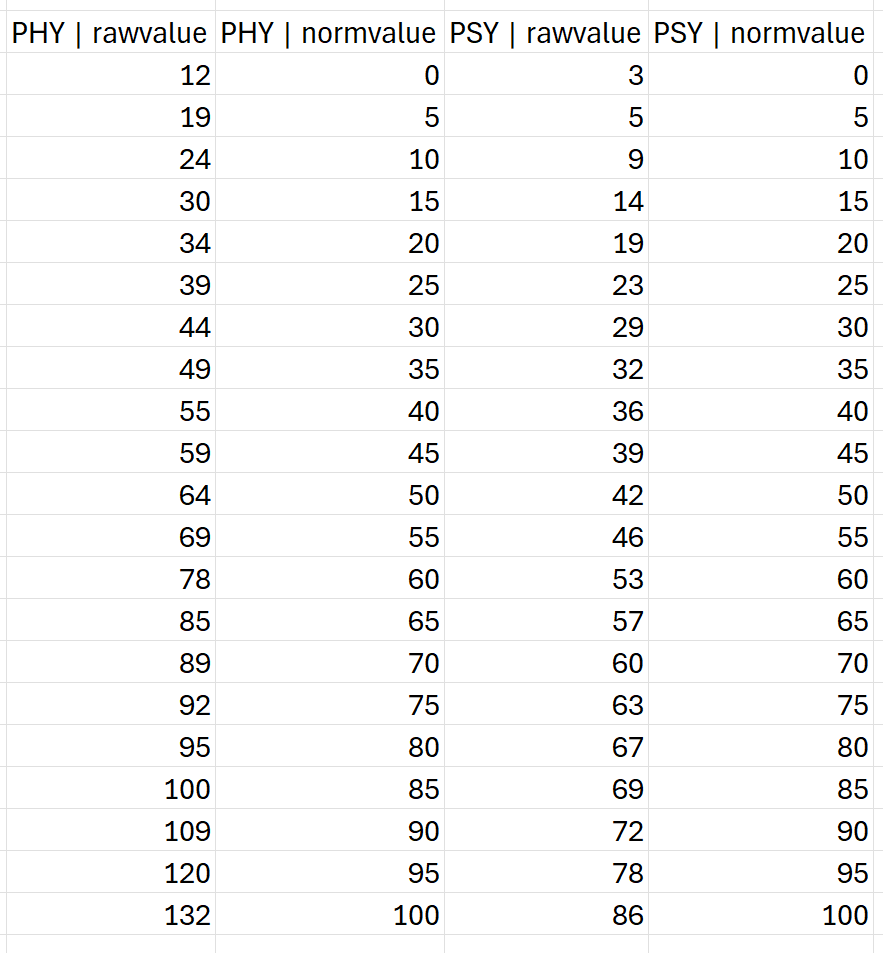
To make it easier to add the values, especially for tests with several normed variables, the values can be imported via a .csv file. The file must correspond to a predefined format. For each variable for which values are to be imported, two columns must be included, one for the raw scores and one for the norm-referenced scores; the raw score is assigned to the norm value using the row in the file. The columns for the raw scores must be named in the format "short name of the variable|rawvalue" (e.g. PHY|rawvalue), those for the norm-referenced scores in the format "short name of the variable|normvalue" (e.g. PHY|normvalue) (see screenshot below).
A template of how the .csv file must be formatted can be downloaded via the Template button. The prerequisite for this is that all variables to be normed have been selected for norming (see above). This file can be opened in common editor programs and the raw and norm-referenced scores can be entered (see screenshot above).
Attention: The expected separator between the values is a comma. Some editor programs use a semicolon by default when files are saved as .csv. Before importing, we recommend checking the file in a text editor.
The .csv file created in this way can then be selected and imported using the Import button. Each import overwrites all existing values in the norms.
Creating norms with subgroups
It is possible to create norms with subgroups. These allow separate norms to be created and used on the basis of socio-demographic characteristics. This, for instance, allows norms to be created for specific age groups. If a person is tested and the age-specific norms are used, the appropriate age group is automatically selected as the comparison sample.
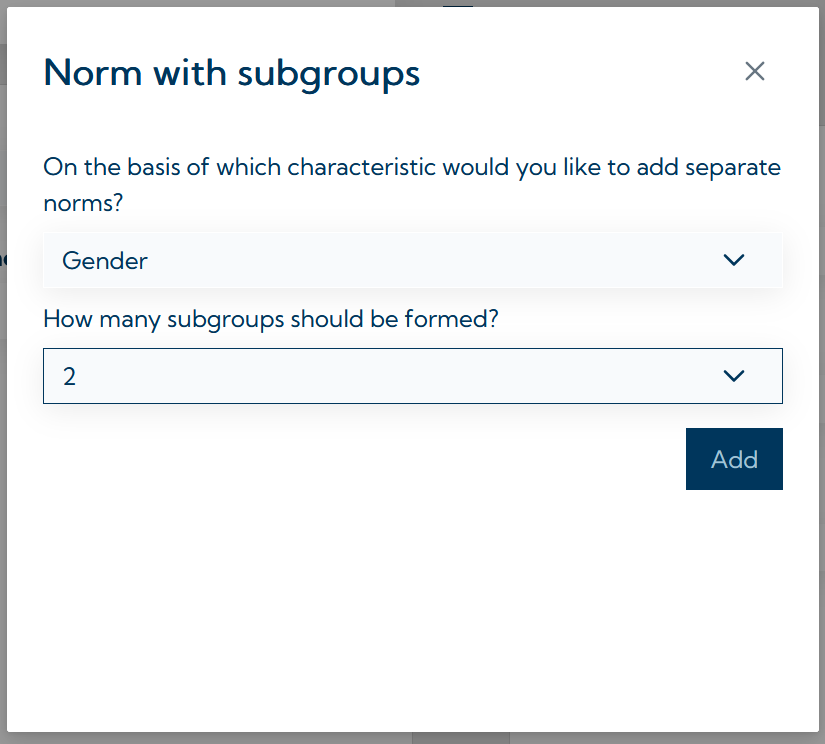
To create a norm with subgroups, select the option Norm with subgroups when adding a new norm. Then, in the first step, select the characteristic that was used for the creation of the norms per subgroups and then select the number of subgroups (see screenshot below).
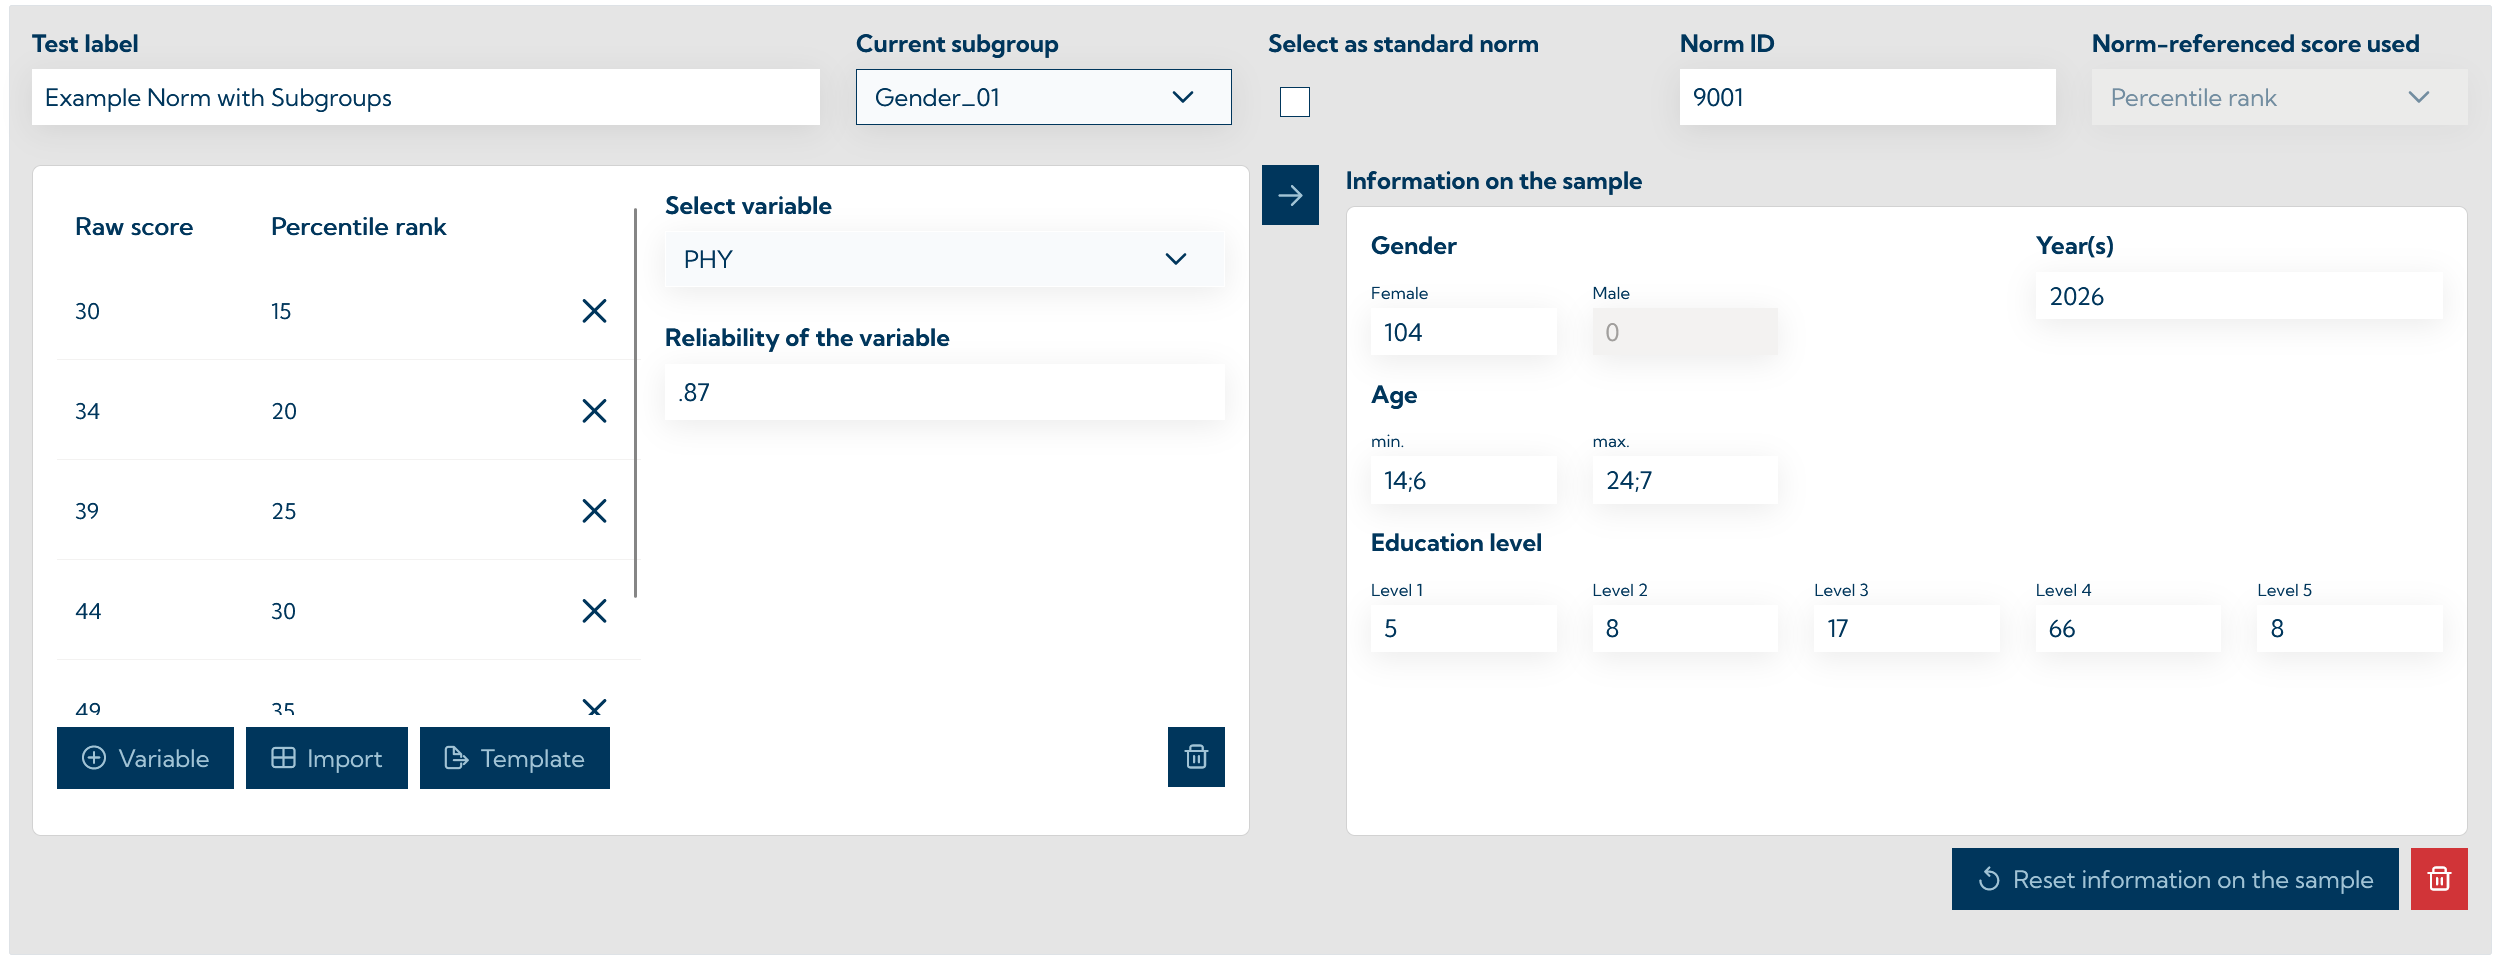
The norm editor now allows you to select each subgroup in the Current subgroup field and enter the corresponding values for each group. It is important that the information for the relevant characteristic (age, gender or education level) is entered appropriately in the Information on the sample field. This means that the composition of each subgroup must be specified. For instance, if the characteristic gender is selected, it must be specified for the group Gender_01 whether it contains women or men. This makes it possible to implement gender-specific norms for women and men (see screenshot below).
The same procedure can be used to create age-specific norms for different age groups (for example one norm for persons in the 20-40 age range and one for persons in the 41-70 age range). When creating norms for subgroups based on education level, only two groups can be created, with each group containing one or more education levels (e.g. one norm for education level 1-3 and one for education level 4-5).
The meaningful use of norms with subgroups requires that the relevant characteristics of the respondents are known and entered in the VTS (age, education level and gender).