
This page provides information about the manual installation of the VTS database on a Microsoft® SQL Server using a script. The required Microsoft® SQL Server version can be found in the system requirements for the VTS version to be installed.
These instructions apply if you are performing a custom VTS installation for the first time and are not using the included Microsoft® SQL Server Express version.
If you are updating a VTS version that uses a manually installed SQL Server, you must also update the SQL Server or the corresponding VTS databases manually using scripts. Instructions are available here Manual update of the VTS SQL database.
Prerequisites
-
The SQL server is installed (the version corresponds to the system requirements of the VTS version to be installed).
-
You have the SQL Server login data with sufficient rights to create further logins.
-
You have permission to execute scripts with the user
sa. -
You have the necessary SQL scripts for creating the database. These can be found in the VTS installation files (setup) in the
Scriptsfolder.
Preparing the SQL Server
Before the database can be set up using the scripts, a login “wtsnx” must be created in the designated database instance. This is mandatory for the installation!
You will receive the login password from our technical support. Please contact Support for this.
-
Creating the login “wtsnx” with Microsoft SQL Server Management Studio:
-
Connect to the appropriate SQL Server instance.
-
Navigate to Security --> Logins and add a login with the following details:
-
Login name:
wtsnx -
Login type: SQL Server authentication
-
Password: Contact our Support
-
Enforce password policy: Deactivate this option
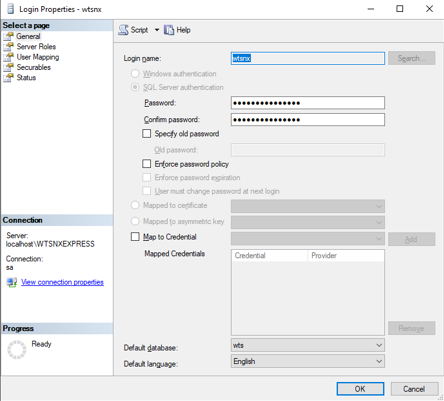
-
-
Creating the databases for installing the VTS
In this step, all databases required for installing the VTS are set up one after the other using the corresponding scripts.
The following databases must be created:
-
WTS database: contains person and test data
The scripts are located in the installation files under Scripts\First Installation.
v10.X.X stands for the corresponding VTS version. For example, if you are installing VTS 10.00, the scripts are labeled v10.00.0.
1. Creating the WTS database
Run the following scripts in the exact order listed below and follow the instructions provided for executing the scripts.
1. wts_1_create_database_v10.X.X.sql
2. wts_2_create_tables_v10.X.X.sql
3. wts_3_insert_data_v10.X.X.sql
4. wts_4_optimize_database_v10.X.X.sql
5. wts_5_updateCompatiblityLevel_v10.X.X.sql
Notes on executing the scripts
-
Make sure that the database is created with the collation Latin1_General_CI_AI.
-
Make sure to execute the scripts with sa user (or a user with equivalent rights).
-
By default, a database with the name wts_deploy is created.
-
Do not use a hyphen (‘-’) if you use a different name for the database.
-
If a different name is to be used when creating the database, the four SQL scripts must be adjusted accordingly.
-
-
Scripts 1, 2, 4 and 5 can generally be executed from Microsoft SQL Server Management Studio.
-
Execute script 3 via the sqlcmd command line. The command for this is:
sqlcmd -S <NameorIPofSQLServer>\<InstanceName> -U sa -P <password> -d <DatabaseName> -I -i <path to script & scriptname.sql>-
Correct installation can only be guaranteed with the user sa!
-
Example of the installation command for script 3
sqlcmd  -S localhost\wtsnxexpress
        -U sa
        -P 1234
        -d wts
        -I
        -i C:\temp\wts_3_insert_data_v10.0.0.sql