The REST API plugin offers a general HTTP REST interface for integrating VTS with external applications. It is available in both VTS online and VTS offline.
The REST API plugin is available from VTS version 8.30. The API is currently provided free of charge.However, please note that this pricing model is subject to change in future releases. As the API continues to evolve, the interface and endpoints may be modified in upcoming versions to improve functionality and performance.
Overview of functionality
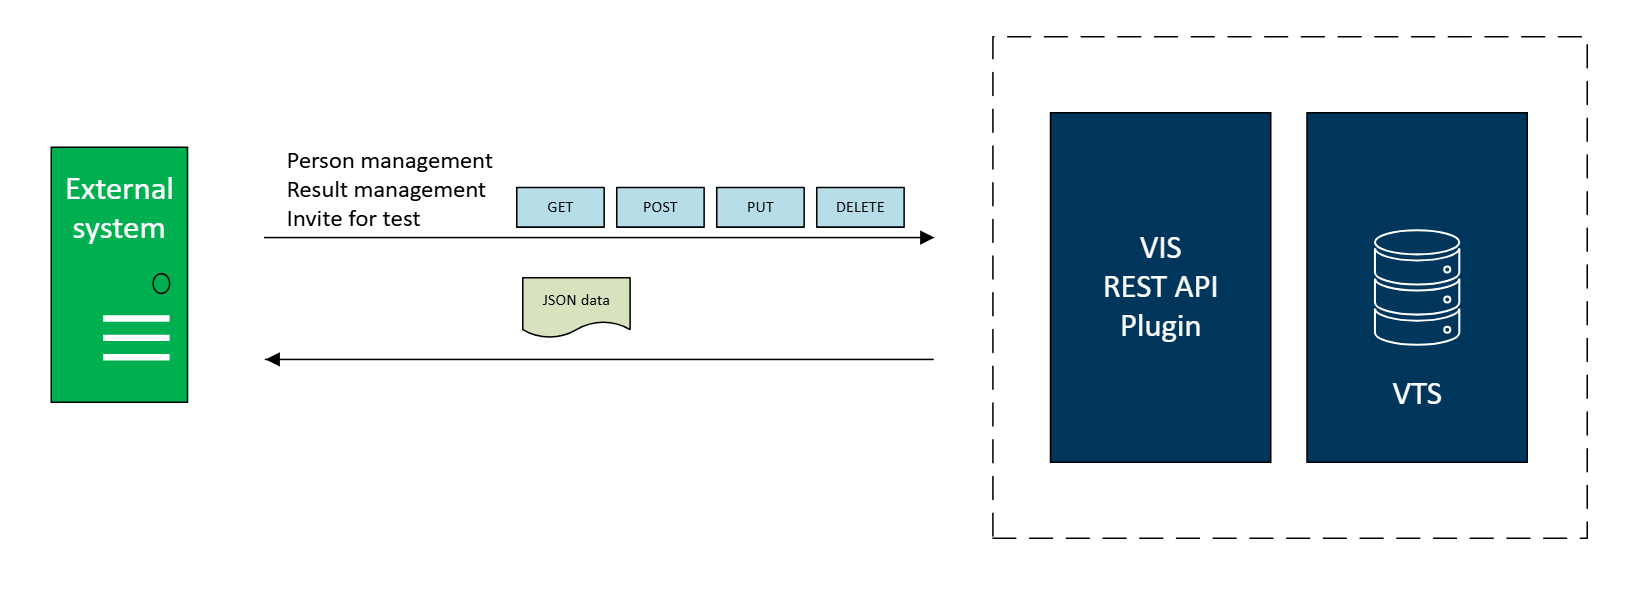
The REST API plugin provides endpoints for managing person records, test results, and generating invitation links for online testing sessions (see also: Testing ).
All data exchanged via the REST API is transmitted in JSON format, ensuring compatibility and ease of integration with modern applications.
Access to these endpoints requires authentication via a private token, which is uniquely assigned to a registered VTS user. All operations performed through the REST API are securely logged under the identity of the associated user, ensuring traceability and accountability.
Setup and configuration
In VTS online, the REST API is ready to use without additional configuration. In VTS offline, it is necessary that the the plugin is properly enabled and network access is granted.
Here is a short step by step guide on how to configure a minimal working setup. For advanced options please refer to the sections below.
1. Adapt the VIS settings file (VTS offline only)
The REST API plugin must be enabled and configured in the VIS settings file by default located in C:\Program Files\SCHUHFRIED GmbH\Vienna Test System 8\IntegrationService\appsettings.json
Note: This is the default installation path. If the Vienna Test System was installed to a different location, the actual path may vary accordingly.
This file contains the configuration of all available VIS plugins. All settings relevant to the REST API plugin can be found under the section starting with RestApiPlugin.
"RestApiPlugin": {
  //...
}
1.1. Enable the REST API plugin
In order to use the REST API plugin, ensure the value of the Enabled property is set to true (it is enabled by default).
"Enabled": "true",
1.2. (Optional) Configure a custom port
If a port different to the standard one shall be used to listen to incoming requests, it needs to be changed in a setting named Url, located in “RestApiPlugin/Kestrel/Endpoints/Http/Url“ and “RestApiPlugin/Kestrel/Endpoints/HttpsInlineCertStore/Url“, the latter being the https endpoint. Please note that the http endpoint always redirects to the https endpoint.
"RestApiPlugin": {
  "Enabled": "true",
  "CertificateSearchKind": "FindBySubjectName",
  "CertificateSearchValue": "SchuhfriedSelfSignedCertificate",
  "Kestrel": {
    "EndPoints": {
      "Http": {
        "Url": "http://localhost:9011"
      },
      "HttpsInlineCertStore": {
        "Url": "https://localhost:9012"
      }
    }
  }
},
1.3. Apply changes
2. Ensure network access (VTS offline only)
The VTS REST API service listens on port 9012 by default. In environments with active firewalls (e.g., Windows Defender), this port is restricted to local traffic. To enable connectivity for integrated applications, ensure your network rules permit traffic through port 9012.
To maintain a secure environment, we recommend restricting access to this port to specific IP addresses rather than opening it to the entire network.
3. Test your setup
3.1. Verify service operation
To ensure that the plugin is operational, visit the URL https://{VIS Service host and port}/api:
-
For VTS online the URL is: https://vis.schuhfried.com/api
-
For VTS offline, on the host machine, the URL is: https://localhost:9012/api or
https://your_fully_qualified_domain_name:9012/api
In case the API is working, you should see the text “Hello from the REST API...“.
As a programmatic interface, the REST API is designed to be accessed via custom client applications or development tools like Postman and cURL. To get started with your first connection, follow the detailed integration guides provided in the sections below.
2.3. Troubleshooting
In case of any problems, you may check the log files for any hints about what could be wrong (see: REST API plugin | Logging)
-
The /api URL cannot be reached in browser
-
A firewall may block incoming connections to the configured port. Ensure that incoming connections on the specified port are accepted.
-
Verify that the configured port matches the port used in the URL
-
Ensure the WTS Service has been restarted and all settings are correctly applied
-
-
Messages are terminated with 401 or 403 HTTP status codes
-
Ensure that messages are properly authenticated (see below)
-
-
Messages are terminated with error status codes
-
Ensure that there are no inconsistencies in your data, e.g. malformed fields or a reference to a non-existing test battery.
-
Check the logs for information about possible issues.
-
Authentication and connectivity
All API calls must be authenticated using a generated access token. The REST API supports multiple authentication methods, allowing flexibility based on integration needs:
-
Pass the token in the
X-API-KEYheader -
Use the token as a Bearer token in the
Authorizationheader -
Optionally, use the token as the password value in Basic Authentication
Choose the method that best fits your application's security and integration requirements.
HTTP status code 401 Unauthorized is returned when an API call is made without valid authentication. This indicates that the access token is missing, invalid, or expired.
Generating an access token
Access tokens for the REST API can be generated directly in the Vienna Test System on the user detail page.
To generate a token:
-
Navigate to the detail page of the desired user.
-
Click on the three dots next to the assigned environment.
-
Select the option API access tokens from the menu.
-
A window will appear where a new token can be generated.
-
Click on the Generate access token button to create a new token.
The token value must be copied immediately after generation, as it will not be displayed again.
It is not possible to generate multiple tokens for the same user.
Token expiration and revocation
A newly generated token is valid for 12 months. Once the token expires, it can no longer be used for authentication and must be replaced with a new one.
VTS does not offer token rotation with overlapping tokens.
A token can be permanently deleted in the same window where it was generated. If a new token is created afterward, it will be different from the previous one.
API Reference
The base URL of the REST API is https://{VIS Service host and port}/api:
-
For VTS online the URL is: https://vis.schuhfried.com/api
-
For VTS offline, on the host machine, the URL is https://localhost:9012/api or
https://your_fully_qualified_domain_name:9012/api
OpenAPI specification (Swagger)
The available endpoints and schema definitions are documented in the form of an OpenAPI specification (commonly referred to as Swagger file). The actual file for your setup can be obtained via the URL https://{VIS Service URL}/swagger/v1/swagger.json
-
For VTS online the URL is: https://vis.schuhfried.com/swagger/v1/swagger.json
-
For VTS offline, on the host machine, the URL is: https://localhost:9012/swagger/v1/swagger.json or
https://your_fully_qualified_domain_name:9012/swagger/v1/swagger.json
While the OpenAPI specification contains all available endpoints and their data types, the following sections give an overview of the functionality and some additional guidance.
Person management
The person management endpoints in the REST API plugin support the standard HTTP methods: POST, GET, PUT, and DELETE, each corresponding to specific operations:
-
POST: Creates a new person record in the system using the data provided in the request body (in JSON format). Each person is identified by a unique external ID. If no external ID is supplied, the system automatically generates one. The response includes the full data of the newly created person.
-
GET: Retrieves the personal data of a person specified by their unique external ID. The response contains the complete person record in JSON format.
-
PUT: Updates the fields of an existing person identified by their unique external ID, based on the data provided in the request body. The updated person record is returned in the response.
-
DELETE: Permanently removes the person identified by the unique external ID. Deleted data cannot be recovered.
The person management additionally includes an endpoint that returns the IDs of all test sequences and completed results associated with a specific person. This allows clients to efficiently identify which results are available for export or further processing.
All data transmitted through these endpoints is formatted as JSON, ensuring consistency and ease of integration.
Results management
The results management endpoints support exporting data in multiple formats: PDF, CSV, and template-based Word reports. Users can export data for a single result or for an entire test sequence. Additionally, both individual results and full test sequences can be deleted via the API.
The export process is implemented as a two-step asynchronous operation:
-
Initiation: The client initiates the export by specifying the target item and desired format. The API responds with a unique export ID and begins preparing the data asynchronously.
-
Download: The client uses the export ID to request the prepared file. If the file is not yet ready, the API returns HTTP status code
202 Accepted. Once the file is available, the API returns the file stream for download.
PDF exports of result data are generated using the same norms, language, and display settings as configured for the user associated with the authentication token in the Vienna Test System application or portal.
If a PDF with different language, norm, or display configuration is required, the user can conveniently log in to the application, open any result of the same test, and adjust the configuration. The PDF exported via the API will fully match what the user sees in the user interface.
Invite to a test (create test links)
The REST API plugin includes an endpoint for generating test links for online testing. Using test links, persons can start testing in the VTS in open or proctored mode (see: Invitation links for more information). A person, identified by their external ID, can be invited to a specified test battery.
Additionally, it is possible to specify whether the system should automatically send an email invitation to the person. This feature requires an email server to be configured in offline environments (see Email configuration for open mode testing). In VTS online, it works without any additional configuration.
Access control and security
Security level
The REST API enforces access control based on the security level of the authenticated user (see: How to add users and limit their access ).
-
Users with security level 0 or 1 can perform all API actions, unless restricted by data separation based on the department feature (see: REST API plugin | Department).
-
Users with security level 2 can only create new persons and invite them for testing, including sending invitation emails.
-
Users with security level 3 can create new persons and generate invitation links, but cannot send emails.
|
Action |
SL0 |
SL1 |
SL2 |
SL3 |
|---|---|---|---|---|
|
Create new person |
|
|
|
|
|
Generate test invitation link |
|
|
|
|
|
Generate test invitation link and send it via e-mail |
|
|
|
|
|
Get/Edit/Delete person |
|
|
|
|
|
Get/Export/Delete results |
|
|
|
|
Department
The REST API respects data separation based on the department feature. If a user is assigned to a department and data separation is enabled, they can only access persons and results within the same department. However, such users can still create new persons in any department. See also: How to add users and limit their access .
HTTPS
All communication with the VTS REST API must be done over HTTPS. This ensures that data is securely encrypted during transmission. Any requests made via HTTP will automatically be redirected to HTTPS security reasons.
Error handling
The VTS REST API uses a Result pattern for all responses. Each API call returns an HTTP status code 200 OK, regardless of whether the operation was successful or not.
The response includes a field hasError to indicate if an error occurred during processing. If an error is present, a brief description is provided in the message field. If no error occurred, the actual result data is returned in the result object.
Example
{
    "hasError": true,
    "message": "Person not found",
    "result": null
}
Examples
This section provides example API calls using Postman, allowing you to quickly test and explore the REST API functionality. Use these examples to verify authentication, interact with endpoints, and understand request/response formats.
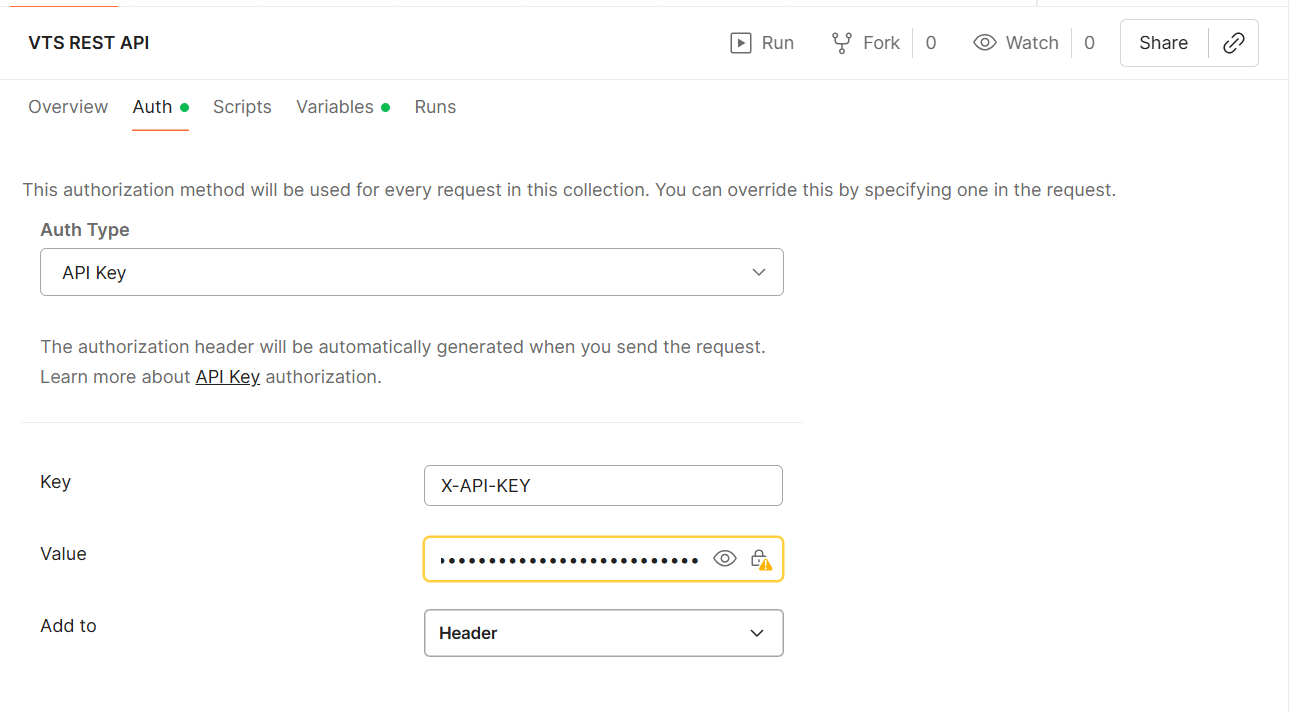
Authentication
In the Authentication tab of the Postman workspace select Auth Type API Key. Paste the token into the value field and specify the key as X-API-KEY
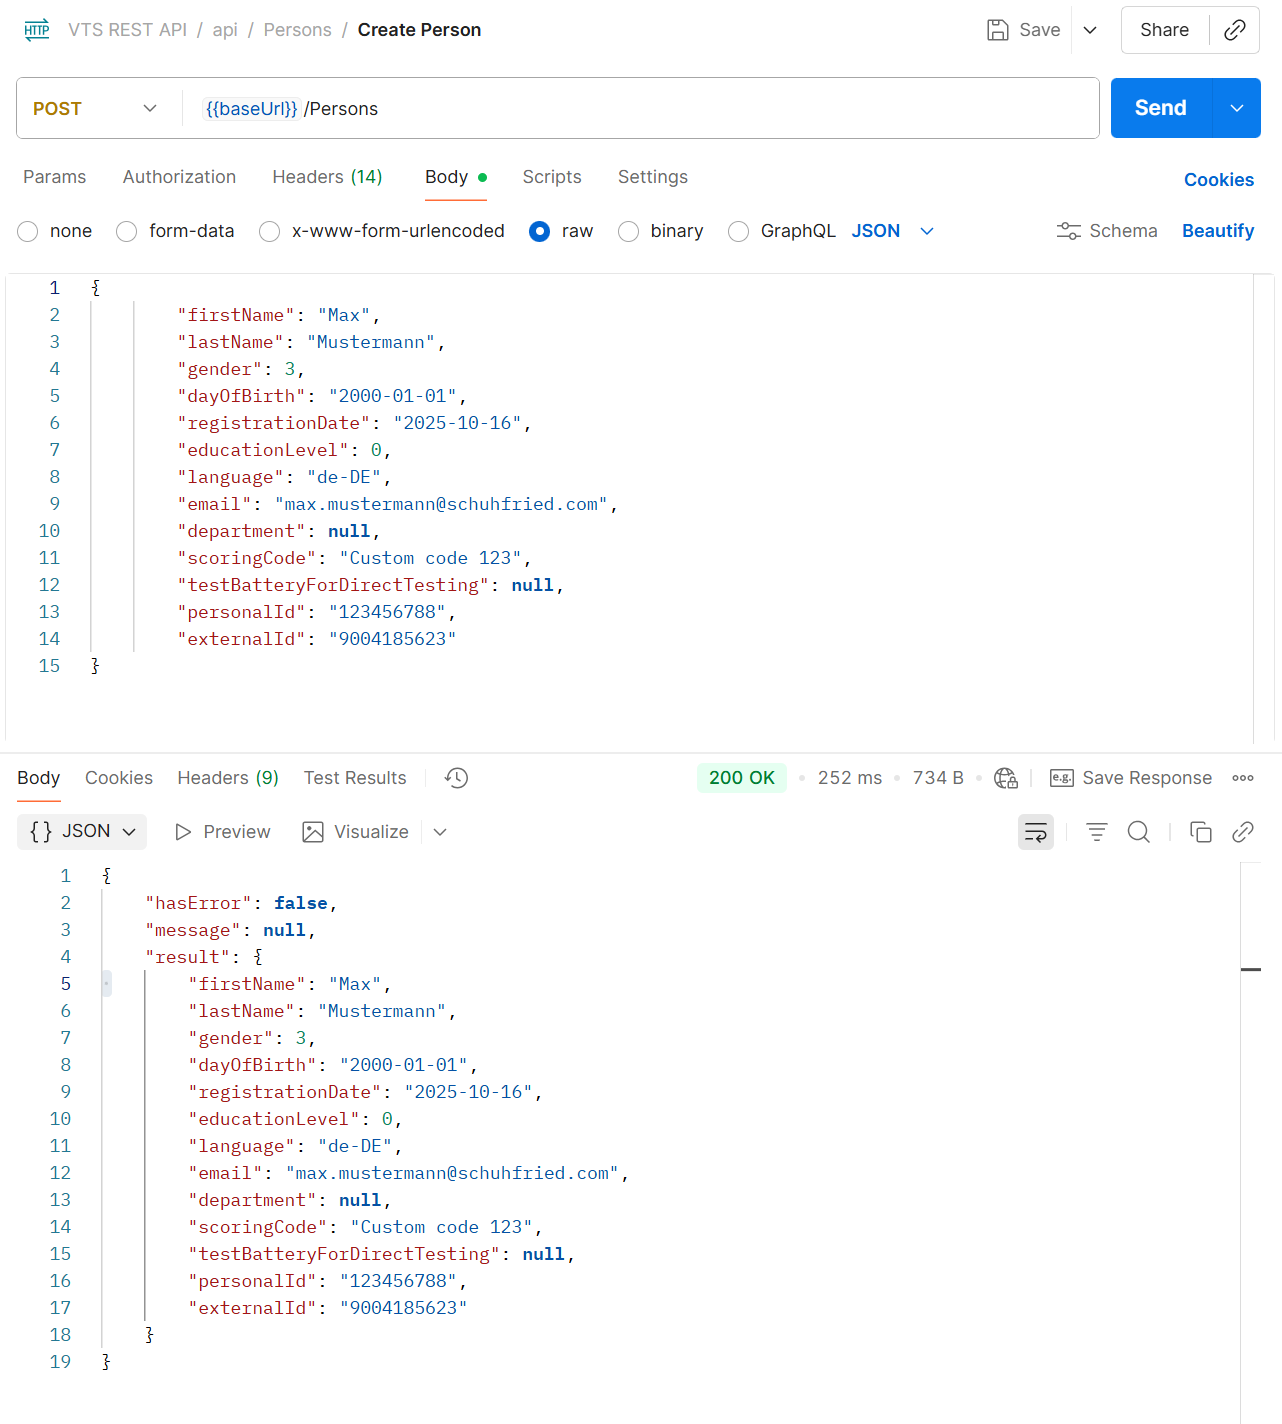
Create new person
Make a POST call to {{baseUrl}}/Persons
Request body
{
        "firstName": "Max",
        "lastName": "Mustermann",
        "gender": 3,
        "dayOfBirth": "2000-01-01",
        "registrationDate": "2025-10-16",
        "educationLevel": 0,
        "language": "de-DE",
        "email": "max.mustermann@schuhfried.com",
        "department": null,
        "scoringCode": "Custom code 123",
        "testBatteryForDirectTesting": null,
        "personalId": "123456788",
        "externalId": "9004185623"
}
Expected response
{
    "hasError": false,
    "message": null,
    "result": {
        "firstName": "Max",
        "lastName": "Mustermann",
        "gender": 3,
        "dayOfBirth": "2000-01-01",
        "registrationDate": "2025-10-16",
        "educationLevel": 0,
        "language": "de-DE",
        "email": "max.mustermann@schuhfried.com",
        "department": null,
        "scoringCode": "Custom code 123",
        "testBatteryForDirectTesting": null,
        "personalId": "123456788",
        "externalId": "9004185623"
    }
}
Delete person
Make a DELETE call to {{baseUrl}}/Persons{{externalId}}
Deleting a person via the REST API will also permanently delete all of their associated test results. This action is irreversible and the data cannot be recovered.
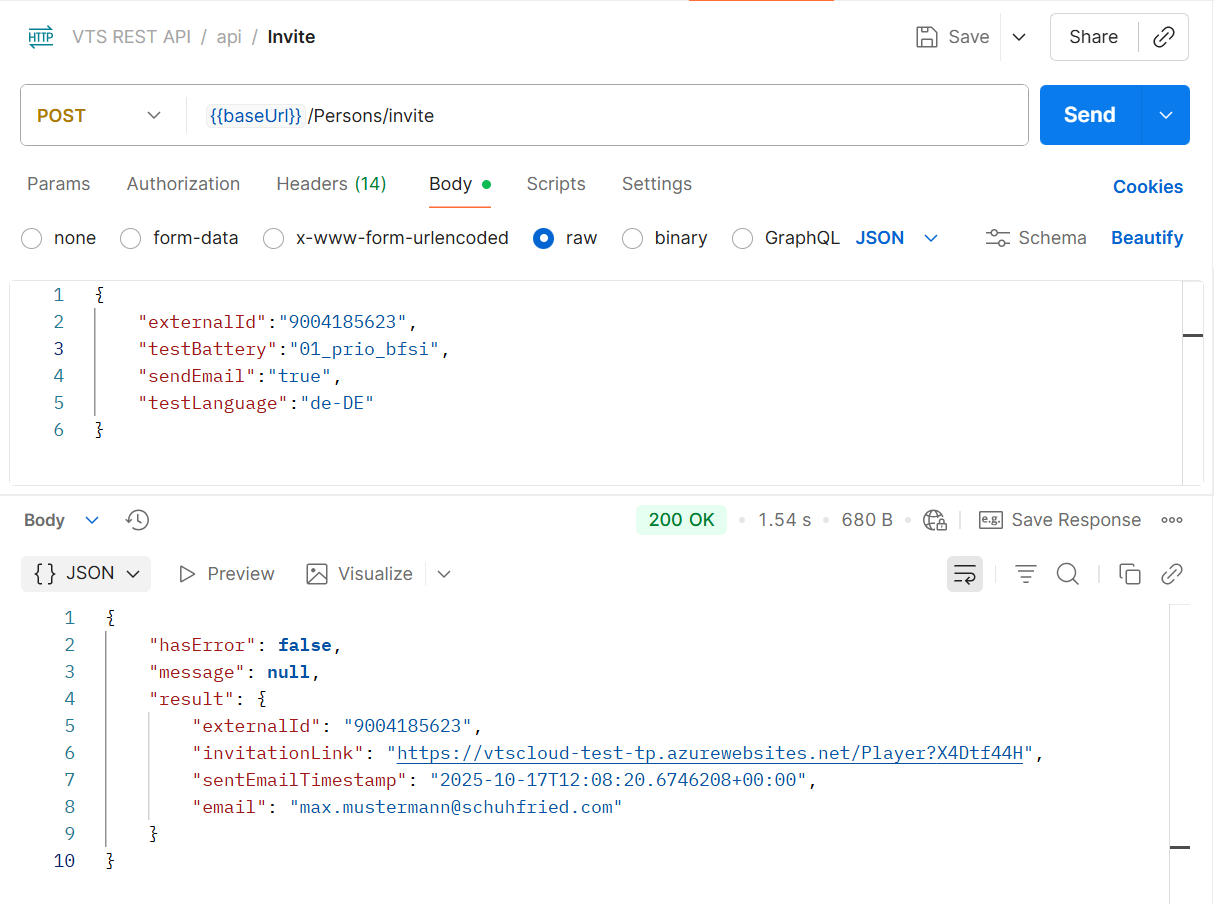
Invite person for an online test
Make a POST call to {{baseUrl}}/Persons/invite. If the POST call is successful, the email is immediately sent.
Request body
{
    "externalId":"9004185623",
    "testBattery":"01_prio_bfsi",
    "sendEmail":"true",
    "testLanguage":"de-DE"
}
Expected response
{
    "hasError": false,
    "message": null,
    "result": {
        "externalId": "9004185623",
        "invitationLink": "https://vtscloud-test-tp.azurewebsites.net/Player?X4Dtf44H",
        "sentEmailTimestamp": "2025-10-17T12:08:20.6746208+00:00",
        "email": "max.mustermann@schuhfried.com"
    }
}
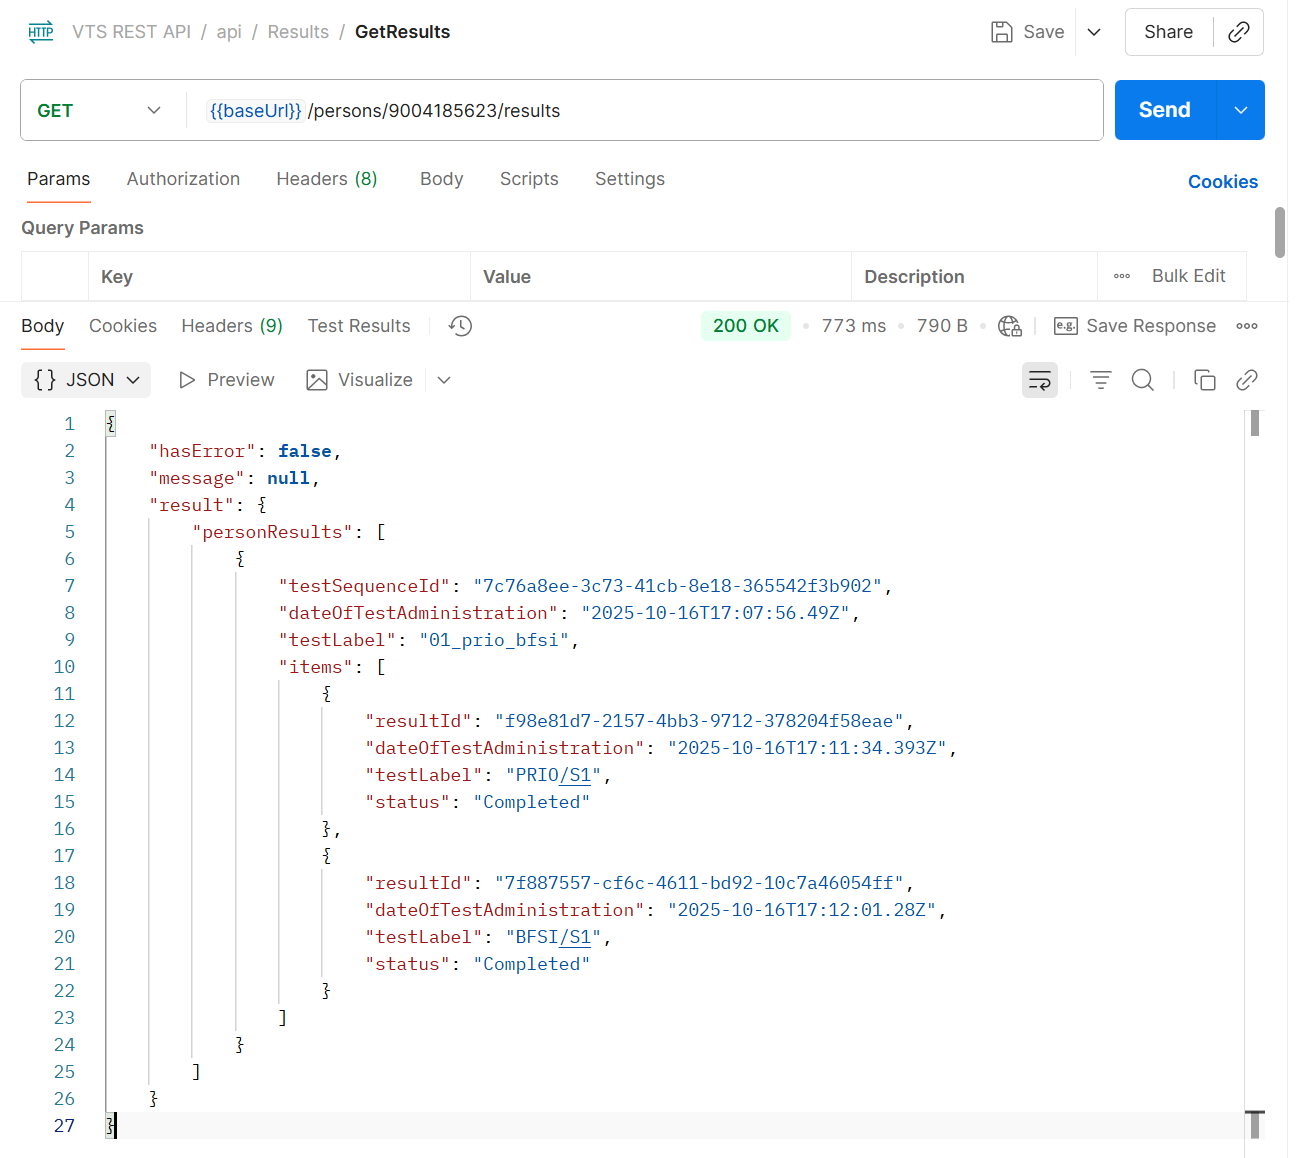
Get results of person
Make a GET call to {{baseUrl}}/Persons/{{external id}}/test-sequences. The response provides the status of the tests in the test sequence, the test sequence ID ("testSequenceId") and the result IDs ("resultId"). The test sequence ID and the result IDs can be used to retrieve the results (e.g. as PDF) over the result management endpoints (see below).
Expected response
{
    "hasError": false,
    "message": null,
    "result": {
        "testSequences": [
            {
                "testSequenceId": "7c76a8ee-3c73-41cb-8e18-365542f3b902",
                "dateOfTestAdministration": "2025-10-16T17:07:56.49Z",
                "testLabel": "01_prio_bfsi",
                "tests": [
                    {
                        "resultId": "f98e81d7-2157-4bb3-9712-378204f58eae",
                        "dateOfTestAdministration": "2025-10-16T17:11:34.393Z",
                        "testLabel": "PRIO/S1",
                        "status": "Completed"
                    },
                    {
                        "resultId": "7f887557-cf6c-4611-bd92-10c7a46054ff",
                        "dateOfTestAdministration": "2025-10-16T17:12:01.28Z",
                        "testLabel": "BFSI/S1",
                        "status": "Completed"
                    }
                ]
            }
        ]
    }
}
Export single result as PDF
Export of data is done in two steps. First, an export ID is generated, which triggers the backend to start creating the file. Then, a second call is made to download the file. If the file is not ready when the second call is made, the endpoint returns HTTP status code 202 Accepted, indicating that the request should be repeated after some time.
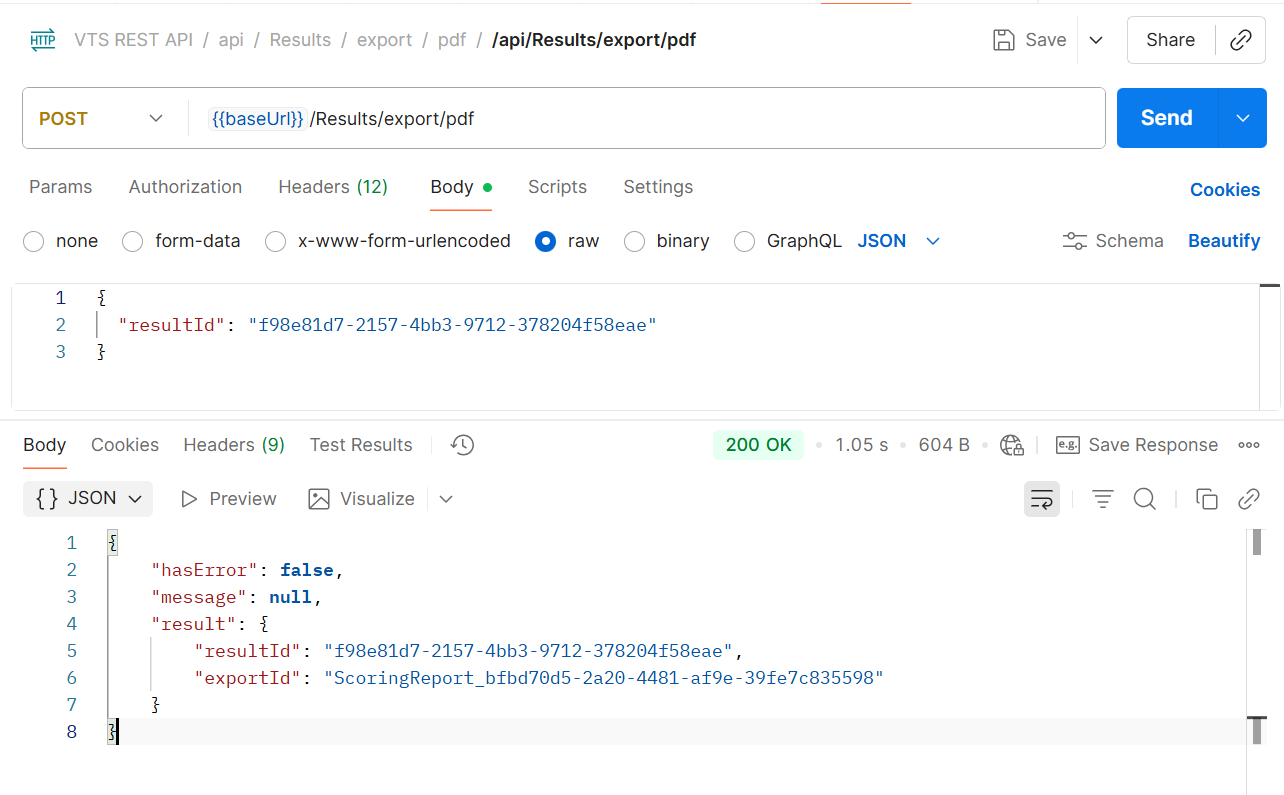
Trigger the export
Make a POST call to {{baseUrl}}/Results/export/pdf
Request body
Use the result id of a single test result obtained from the response of the GET call to /Persons/{{external id}}/test-sequences (see above).
{
  "resultId": "f98e81d7-2157-4bb3-9712-378204f58eae"
}
Expected result
{
    "hasError": false,
    "message": null,
    "result": {
        "resultId": "f98e81d7-2157-4bb3-9712-378204f58eae",
        "exportId": "ScoringReport_bfbd70d5-2a20-4481-af9e-39fe7c835598"
    }
}
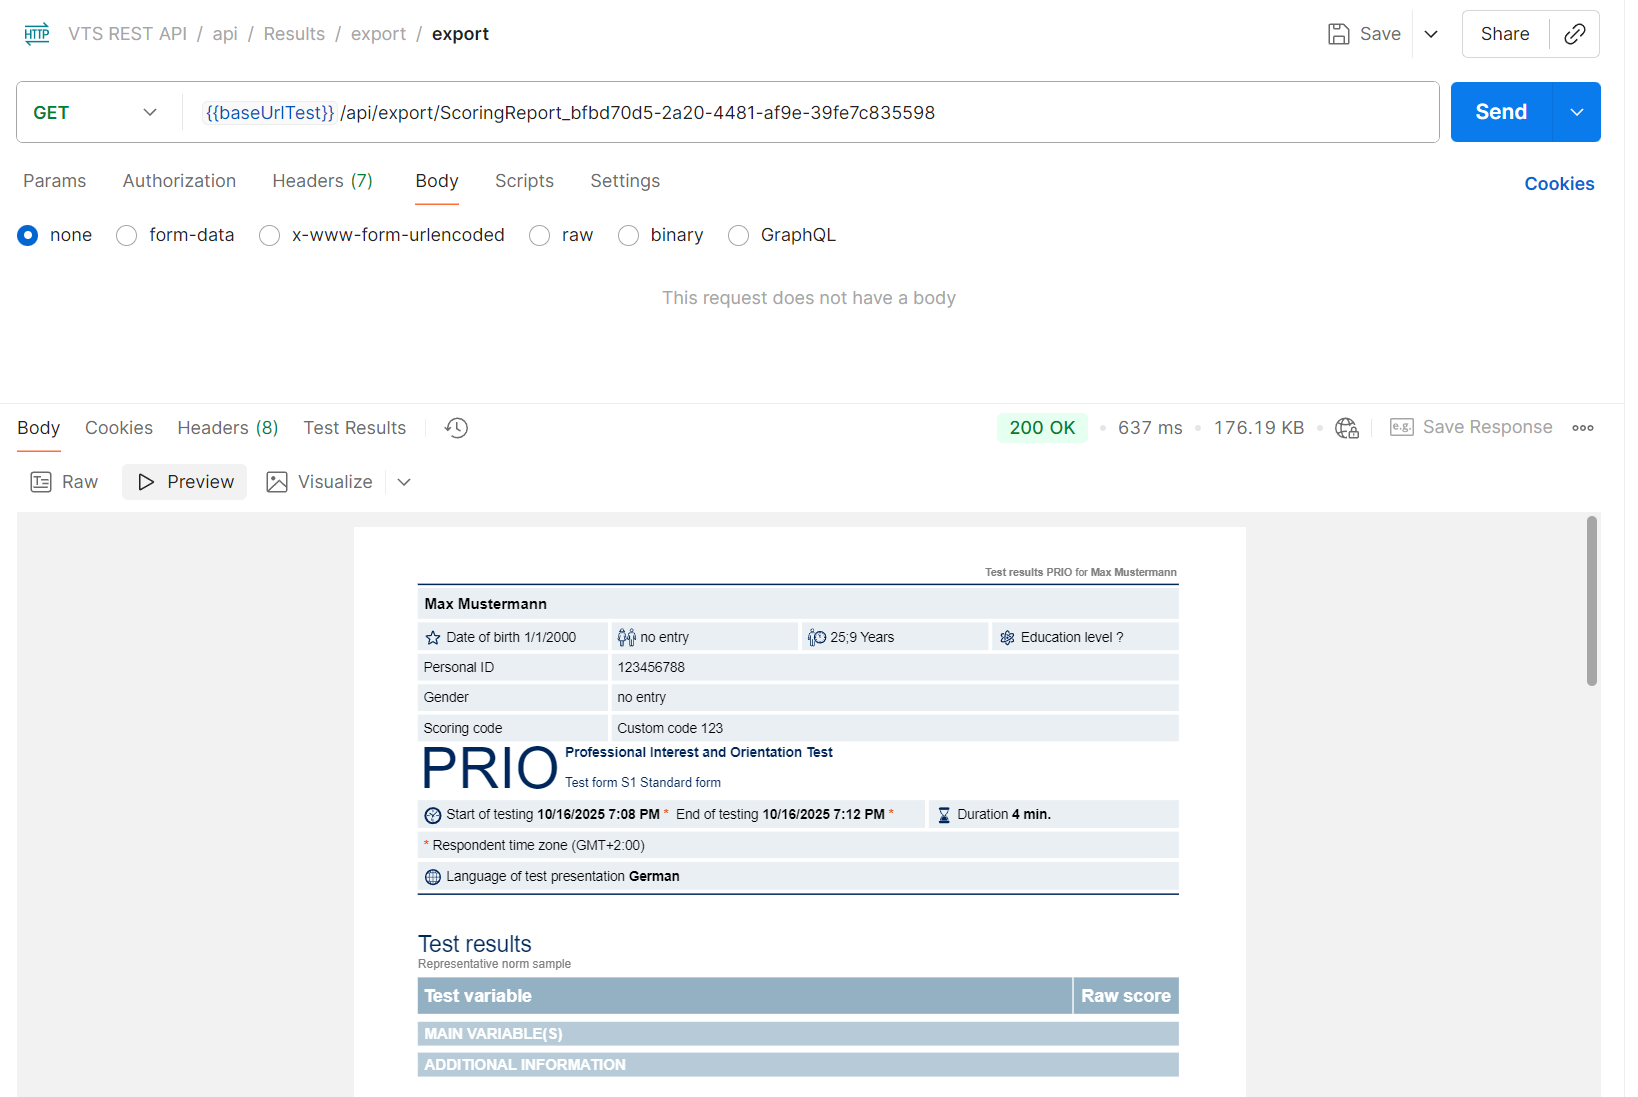
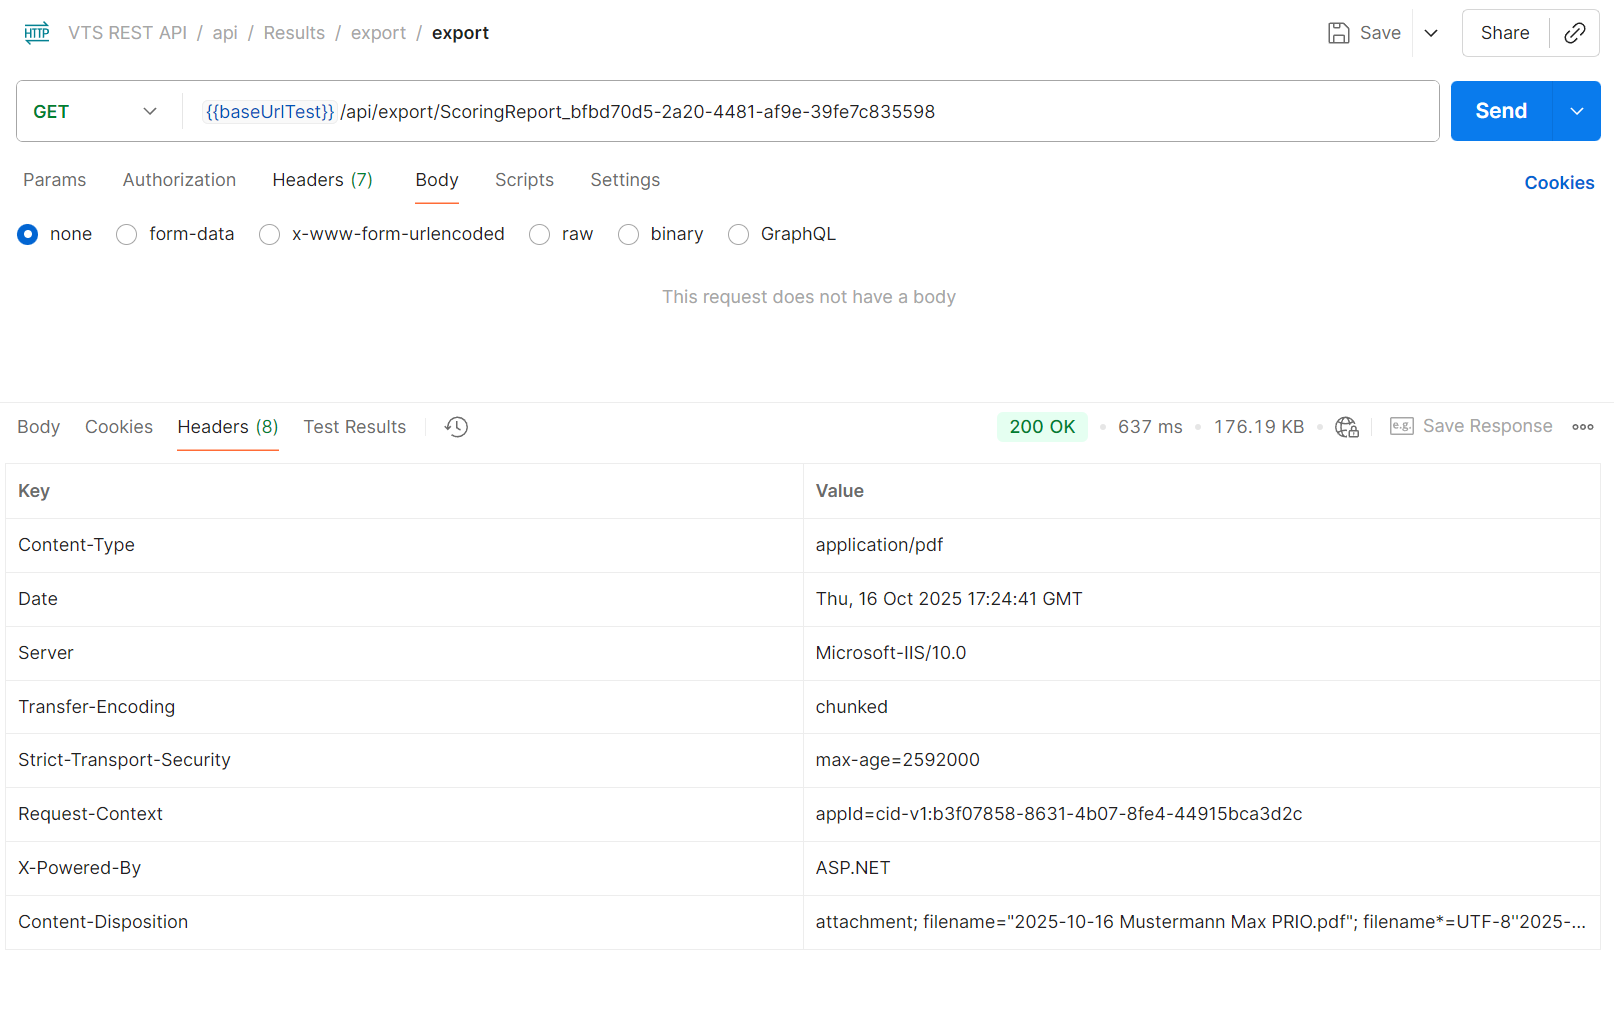
Download the file
Make a GET call to {{baseUrl}}/export/{{exportId}}, where the exportId is the value obtained from the first call to /Results/export/pdf.
If the file is not prepared yet, the endpoint will return http code 202 Accepted.
If the file is already prepared, the endpoint will transfer the pdf for the test result. Response header Content-Disposition defines the file name.
Export test sequence as PDF
Export of data is done in two steps. First, an export ID is generated, which triggers the backend to start creating the file. Then, a second call is made to download the file. If the file is not ready when the second call is made, the endpoint returns HTTP status code 202 Accepted, indicating that the request should be repeated after some time.
Trigger the export
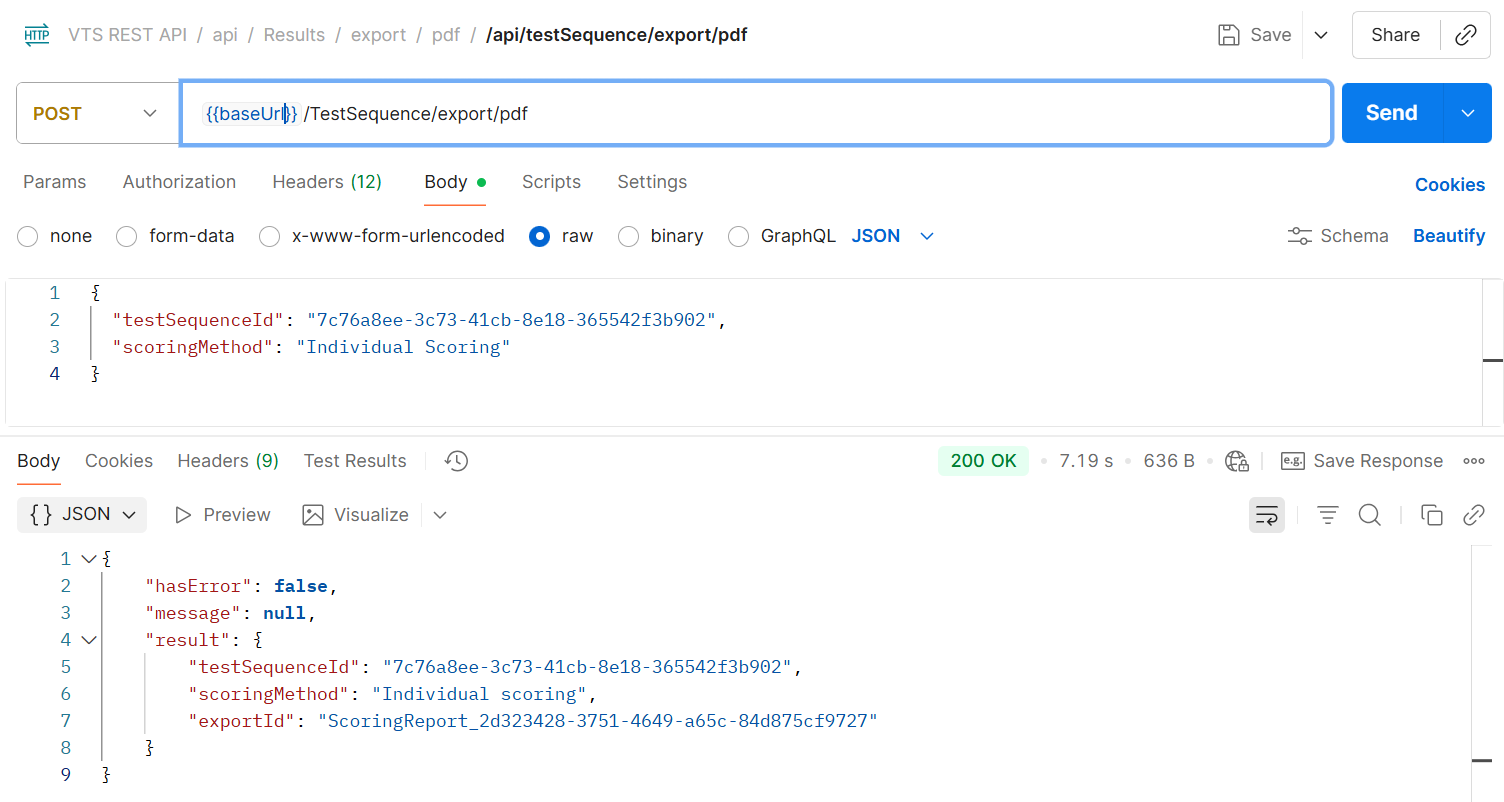
Make a POST call to {{baseUrl}}/test-sequences/export/pdf.
Request body
Use the ID ("testSequenceId") of the whole test sequence containing one or more test results obtained from the response of the call /Persons/{{external id}}/test-sequences.
For the "scoringMethod" value you have several options that can be used, depending on the test batteries you use for testing:
-
Use the
"scoringMethod": "Individual Scoring"for test sequences done by custom test batteries or test sequences done without a battery. -
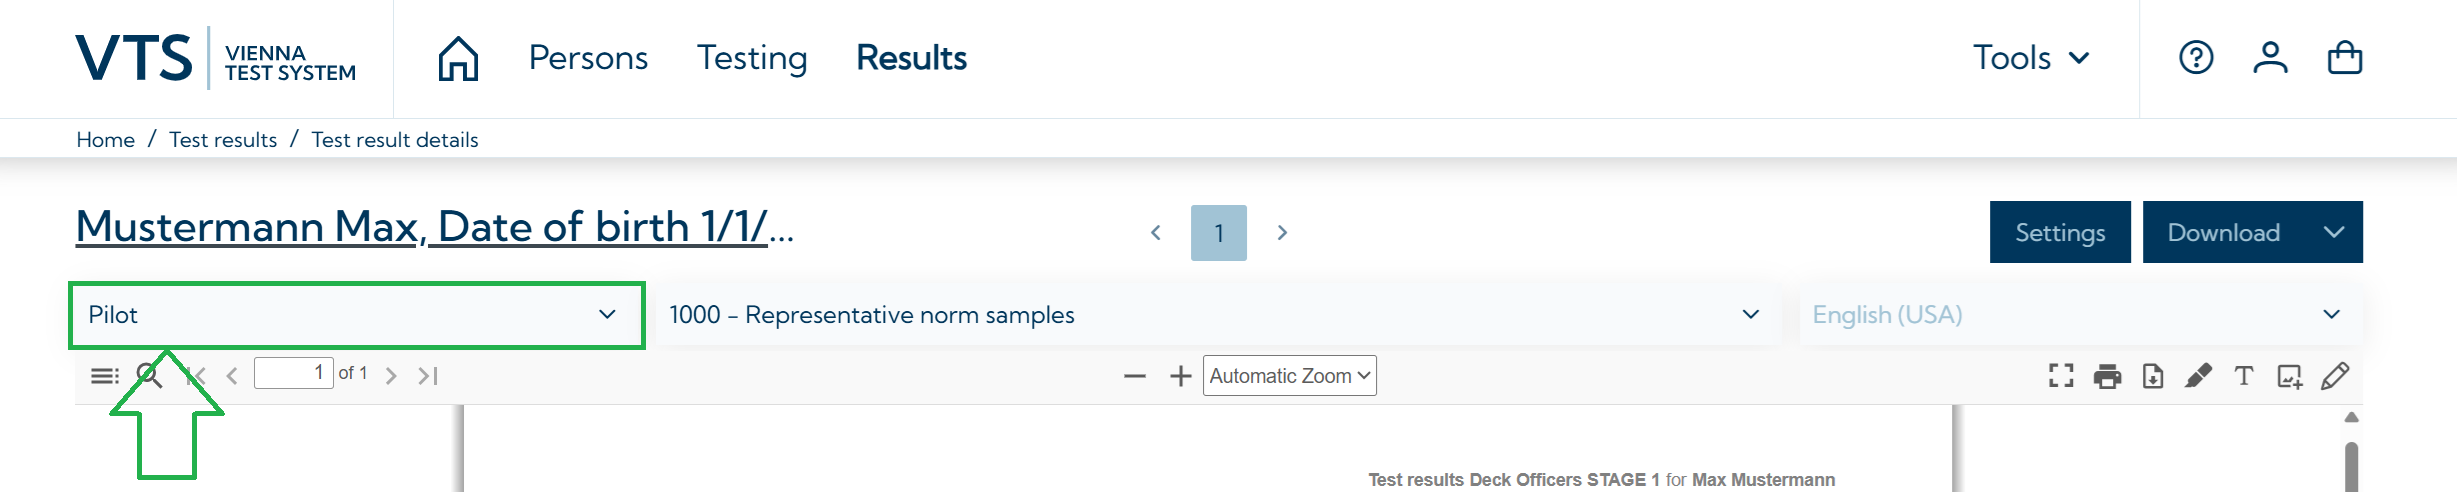
Use the name of a user-defined scoring method if you are using test batteries that have a scoring created by SCHUHFRIED (BATEVA). You can find the name of the user-defined scoring method on the test result details page in the VTS (see screenshot below).
-
If you are using an SFS Test Solution, use the name of the scoring method as shown on the test result details page in VTS (see screenshot below).
Example
{
  "testSequenceId": "7c76a8ee-3c73-41cb-8e18-365542f3b902",
  "scoringMethod": "Individual Scoring"
}
Expected result
{
    "hasError": false,
    "message": null,
    "result": {
        "testSequenceId": "7c76a8ee-3c73-41cb-8e18-365542f3b902",
        "scoringMethod": "Individual scoring",
        "exportId": "ScoringReport_2d323428-3751-4649-a65c-84d875cf9727"
    }
}
Download the file
Make the second call to download the exported file as described in section Export single result as PDF (see: REST API plugin | Download the file)
Export result data in CSV format
Export of data is done in two steps. First, an export ID is generated, which triggers the backend to start creating the file. Then, a second call is made to download the file. If the file is not ready when the second call is made, the endpoint returns HTTP status code 202 Accepted, indicating that the request should be repeated after some time.
Trigger the export
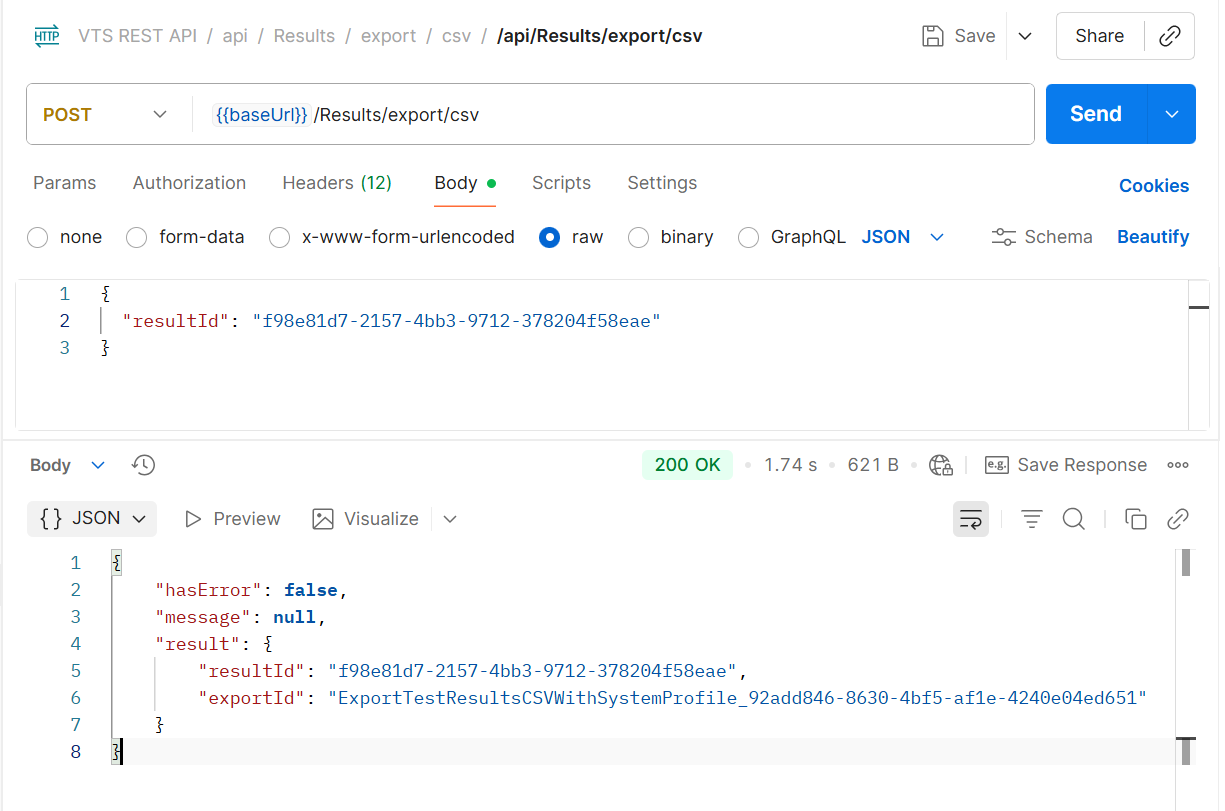
Make a POST call to {{baseUrl}}/Results/export/csv.
Request body
Use id of a single test result obtained from the response of the call /Persons/{{external id}}/test-sequences.
{
  "resultId": "f98e81d7-2157-4bb3-9712-378204f58eae"
}
Expected response
{
    "hasError": false,
    "message": null,
    "result": {
        "resultId": "f98e81d7-2157-4bb3-9712-378204f58eae",
        "exportId": "ExportTestResultsCSVWithSystemProfile_92add846-8630-4bf5-af1e-4240e04ed651"
    }
}
Download the file
Make the second call to download the exported file as described in section Export single result as PDF (see: REST API plugin | Download the file).
Export a result or test sequence with a Word Report
Export of data is done in two steps. First, an export ID is generated, which triggers the backend to start creating the file. Then, a second call is made to download the file. If the file is not ready when the second call is made, the endpoint returns HTTP status code 202 Accepted, indicating that the request should be repeated after some time.
Trigger the export
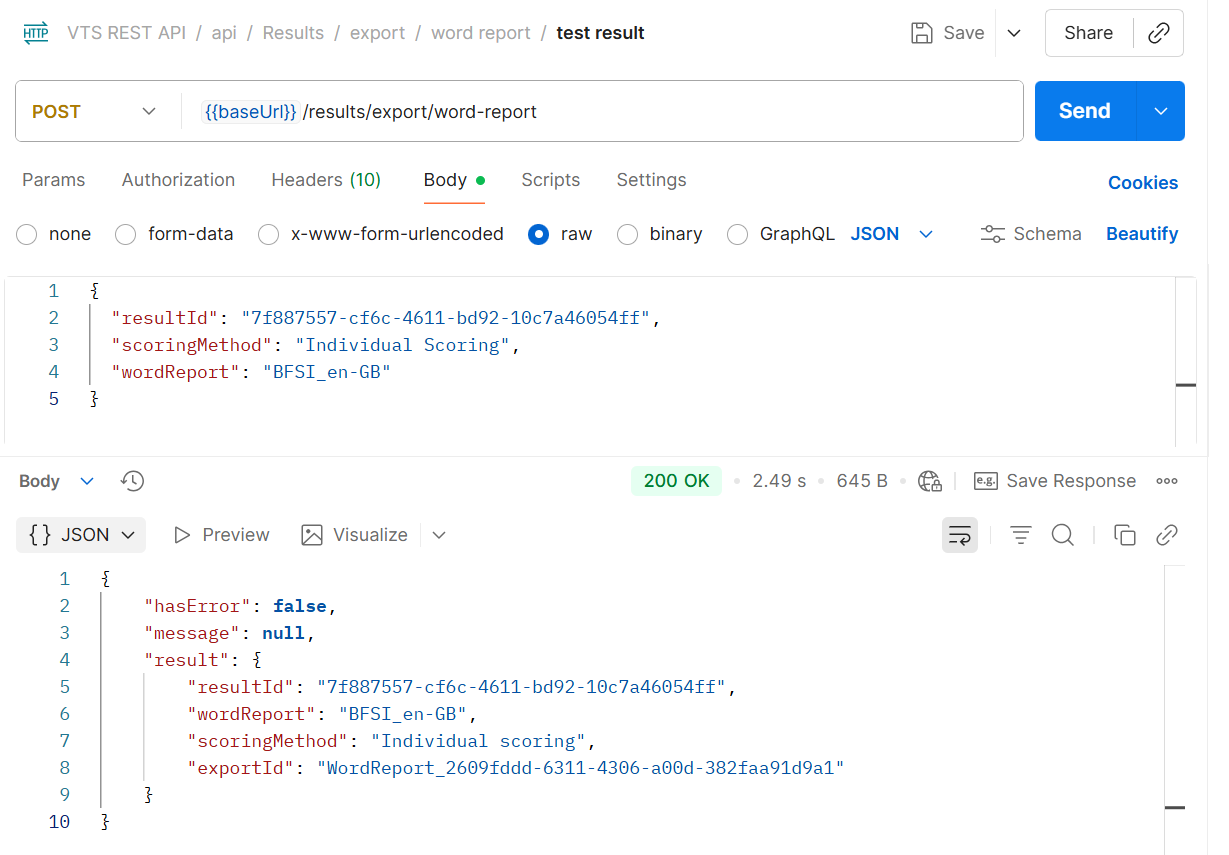
Make a POST call to {{baseUrl}}/results/export/word-report to export a single test result or, to {{baseUrl}}/api/test-sequences/export/word-report to export whole test sequence.
To generate a Word report via the REST API, you must provide either a result ID or a test sequence ID, along with the scoring method and the name of the word report template. For more information about word reports see: Create/import/edit Word reports.
You can find both the scoring method and the template name in the Vienna Test System when generating a Word report through the user interface.
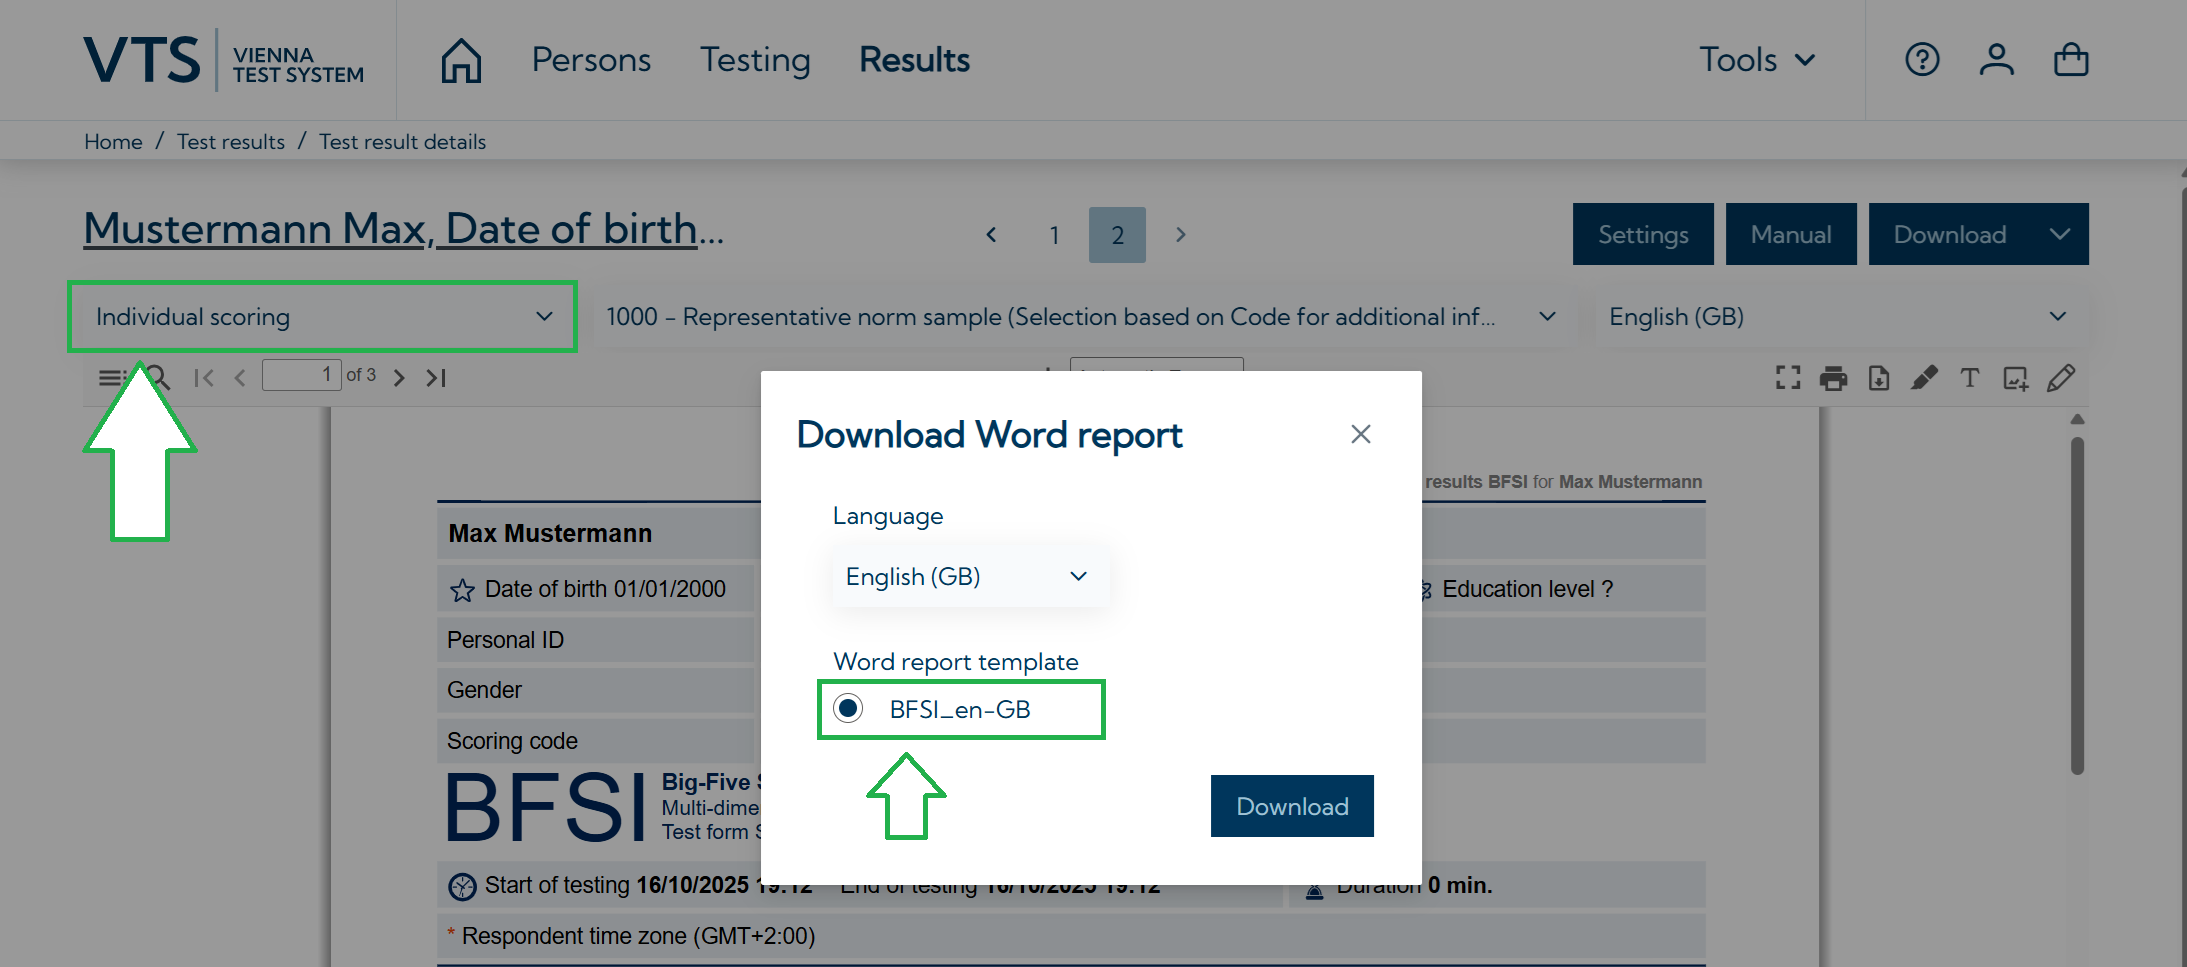
Request body single result
{
  "resultId": "7f887557-cf6c-4611-bd92-10c7a46054ff",
  "scoringMethod": "Individual Scoring",
  "wordReport": "BFSI_en-GB"
}
Request body test sequence
{
  "testSequenceId": "A136FE48-1CA6-41FB-9DD2-620D9D92B4B8",
  "scoringMethod": "Pilots",
  "wordReport": "Pilot report template"
}
Expected response
{
    "hasError": false,
    "message": null,
    "result": {
        "resultId": "7f887557-cf6c-4611-bd92-10c7a46054ff",
        "wordReport": "BFSI_en-GB",
        "scoringMethod": "Individual scoring",
        "exportId": "WordReport_2609fddd-6311-4306-a00d-382faa91d9a1"
    }
}
Download the file
Make the second call to download the exported file as described in section Export single result as PDF (see: REST API plugin | Download the file).
Delete test result
Make a DELETE call to {{baseUrl}}/Results/{{result id}} where the result id is id of a single test result obtained from the response of the call /Persons/{{external id}}/test-sequences.
If the last test of the sequence is deleted, the whole sequence is automatically deleted.
Delete test sequence
Make a DELETE call to {{baseUrl}}/test-sequences/{{sequence id}} where the sequence id is id of the whole test sequence obtained from the response of the call /Persons/{{external id}}/test-sequences.
Logging
The VIS and REST API plugin generate log data that can be used to analyze their functionality. This data is recorded in the following log file:
C:\ProgramData\Schuhfried\Logs\VTS.Integration.Service.log
Please note: The directory “C:\ProgramData” is hidden by default. You can either make hidden items visible in your Windows Explorer or simply paste the path to the file into its address bar.